
The Story of EdgeSentinel
Building a custom drone isn't just about wiring components and running code; it is a test of patience, nerves, and resilience. This is the story of how our team built EdgeSentinel - from a jittery, crash-prone plastic quadcopter to a stable, obstacle-dodging hexacopter.
Chapter 1: The Spark and the Initial Build (The F450 Prototype)
It was late nights, tangled wires, and caffeine. The vision was clear: build an autonomous drone that could detect objects and make its own decisions entirely on-device - no cloud, no ground station, completely independent.
With a tight budget, we assembled our first prototype. It felt like a masterpiece to us:
- A basic plastic F450 Quadcopter frame.
- A Pixhawk 2.4.8 autopilot run by ArduPilot.
- FlySky i6 RC controller transmitter.
- Four cheap 2212 1000KV brushless motors and 30A ESCs.
- A Raspberry Pi 5 (8GB) as our companion brain.
- A standard 720p USB webcam taped to the nose.
- A single 3S 4000 mAh LiPo battery powering the flight systems, and a secondary battery strapped on to power the Pi.
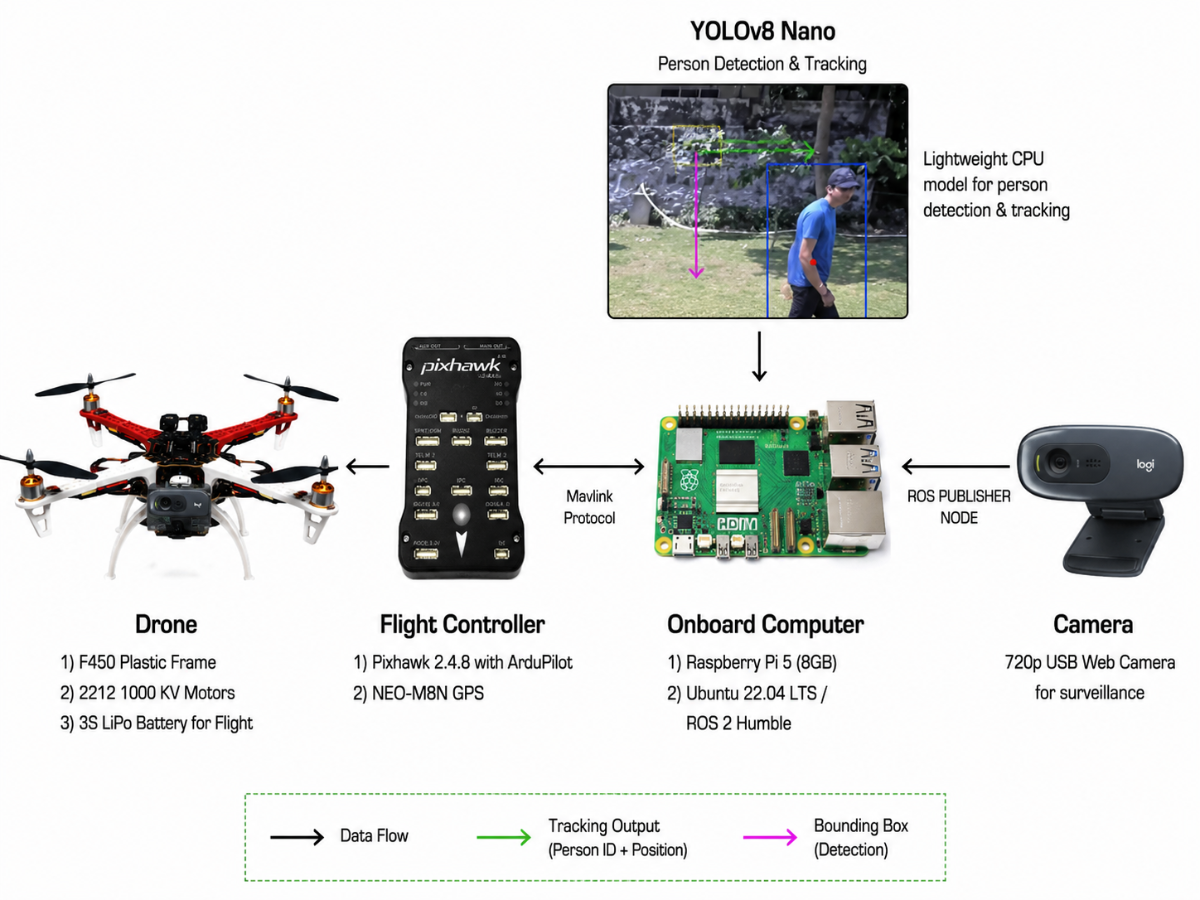
We loaded a lightweight YOLOv8-Nano model to run on the Raspberry Pi's CPU. The setup was bulky, but on our workbench, everything worked. We were thrilled and ready to fly.
Chapter 2: The Reality Check (The Heartbreak of Flight 1 and 2)
Then came the field tests, and with them, the harsh realization that "physics in real life is way more complicated than a software virtual environment (venv)."
The Jerky Drift (Flight 1)
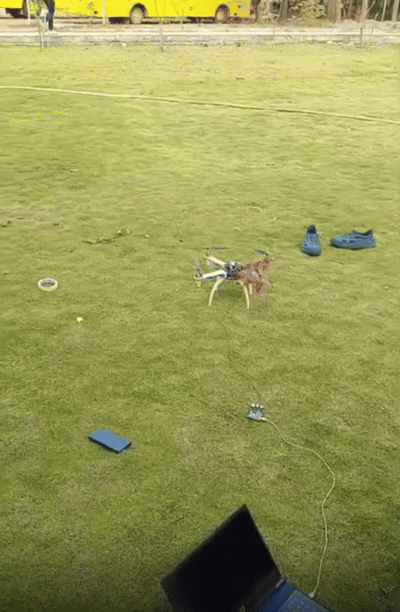
We took the drone to the field, completed our arming sequence, and pushed the throttle. The motors roared, the drone lifted a few centimeters, and then—panic. The drone began to yaw violently and drift towards a fence. Our heart was in our throats as our safety pilot grabbed the RC sticks and pulled manual override, cutting the throttle.
We brought it back, hands shaking. The culprit? Sensor calibration. The accelerometer and compass sensors on the Pixhawk had drifted during transit. It was a humbling lesson: drones are incredibly sensitive machines. We couldn't just "plug and play." We needed to calibrate the sensors before every single flight.
The Mid-Air Blackout (Flight 2)
After calibrating the sensors, we tried again. The drone took off, climbed to a hover, and began its autonomous path. We watched the laptop monitor, cheering as the telemetry feed active.
Then, suddenly, the feed went black. The drone's companion computer had completely shut down mid-air. The drone began to drift with the wind. Fortunately, the Pixhawk's automatic failsafe kicked in and landed the drone safely, but the setback was frustrating.
When we analyzed the logs, we discovered that running YOLOv8 image processing on the Pi's CPU caused its power draw to spike. At the same time, the motors drew high current to stabilize the drone. The voltage dropped, causing a brownout on the Raspberry Pi. We realized we couldn't just run everything on shared power rails—we needed dedicated buck converters to isolate the computer's power.
.gif)
Vibration & GPS Drifts
In the flights that followed, we fought a constant war against two enemies: vibration and electromagnetic noise.
- The plastic F450 frame flexed and vibrated, causing a rolling-shutter "jello" effect on our webcam. The YOLO model couldn't identify people because the image was constantly warping.
- The high-current lines running to our ESCs created a magnetic field that threw off our compass. Our Return-To-Launch (RTL) tests were disastrous, with the drone landing up to 5 meters away from the home point.
Chapter 3: The First Taste of Success
We refused to give up. We redesigned the power board, adding dedicated regulators to keep the Raspberry Pi's voltage stable. We mounted the Pixhawk on vibration-dampening foam plates and routed the power cables away from the compass.
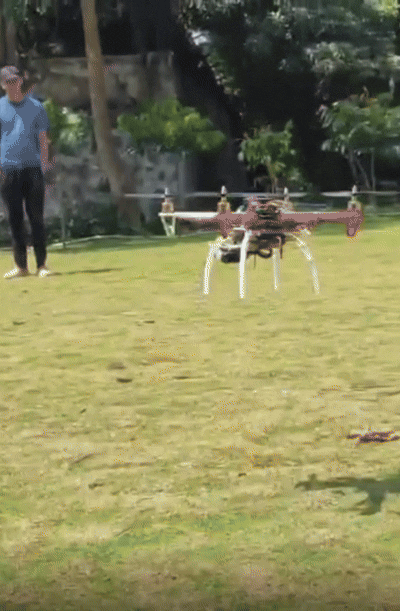
We took the drone back to the field. We armed it, stepped back, and watched.
This time, the drone took off smoothly to 2.0 meters, locked its altitude, hovered in place, and executed a clean, stable auto-landing. The relief was immense.
Next, we loaded a pre-planned waypoint route. The drone followed it, navigating autonomously from point to point while recording video.
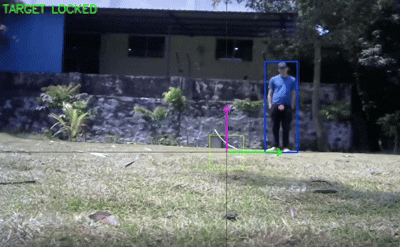
Then came the big milestone: we turned on YOLOv8 tracking. The drone detected our safety lead, and as he walked, the drone rotated its head (yaw) to follow him, keeping him centered in the frame. Even though the frame rate was low (around 4-5 FPS) because the Pi's CPU was working overtime, we had proven that our logic worked.
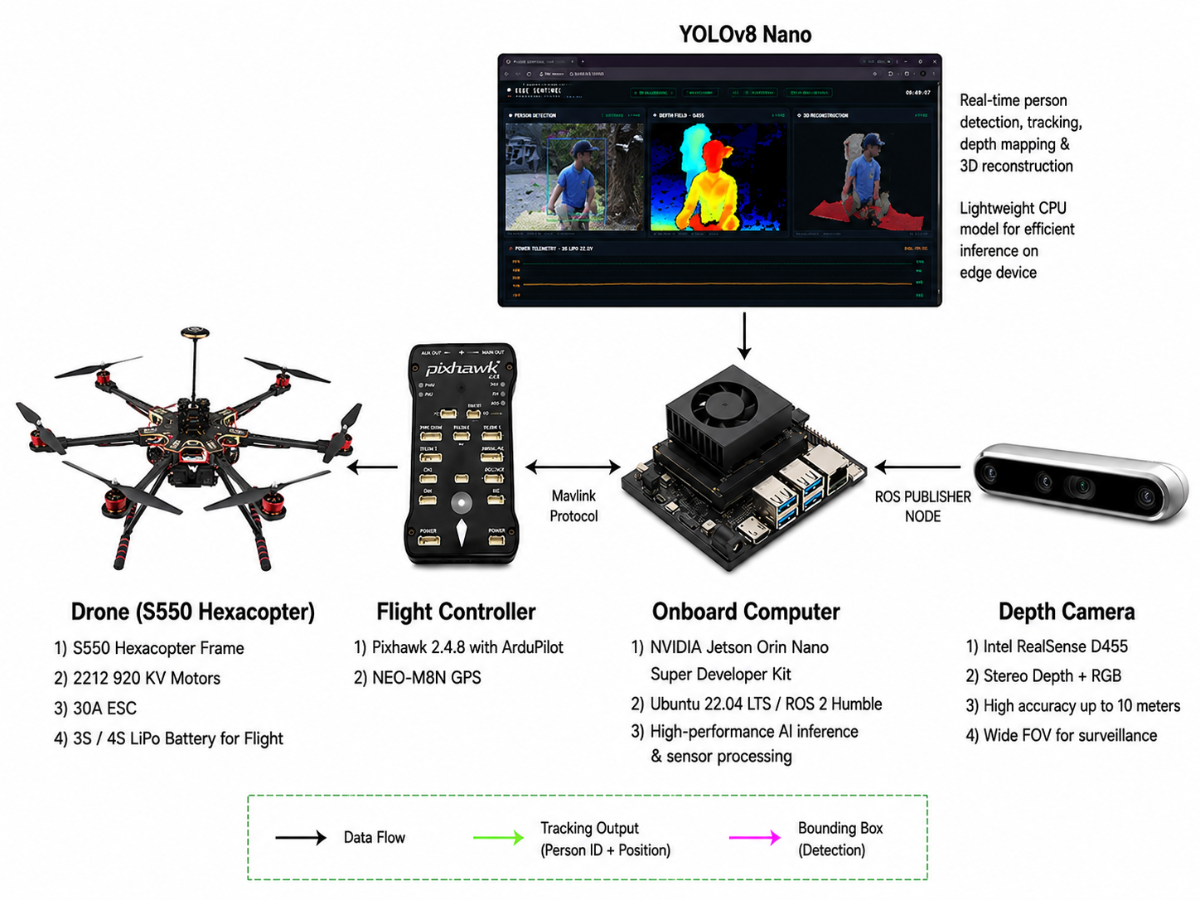
Chapter 4: The Pivot and Upgrade (S550 & Jetson Orin)
Despite our success, we knew the initial prototype had hit a wall. The CPU processing was too slow for real-time avoidance, the webcam couldn't sense distance, and the plastic frame vibrated too much. We needed to upgrade.
We made three critical upgrades:
- The Brain: We replaced the Raspberry Pi 5 with an NVIDIA Jetson Orin Nano (8GB). This gave us a powerful GPU (40 TOPS) to run AI models in real time.
- The Eyes: We threw away the 720p webcam and installed an Intel RealSense D455 Stereo Depth Camera, giving the drone the ability to "see" distances in real time.
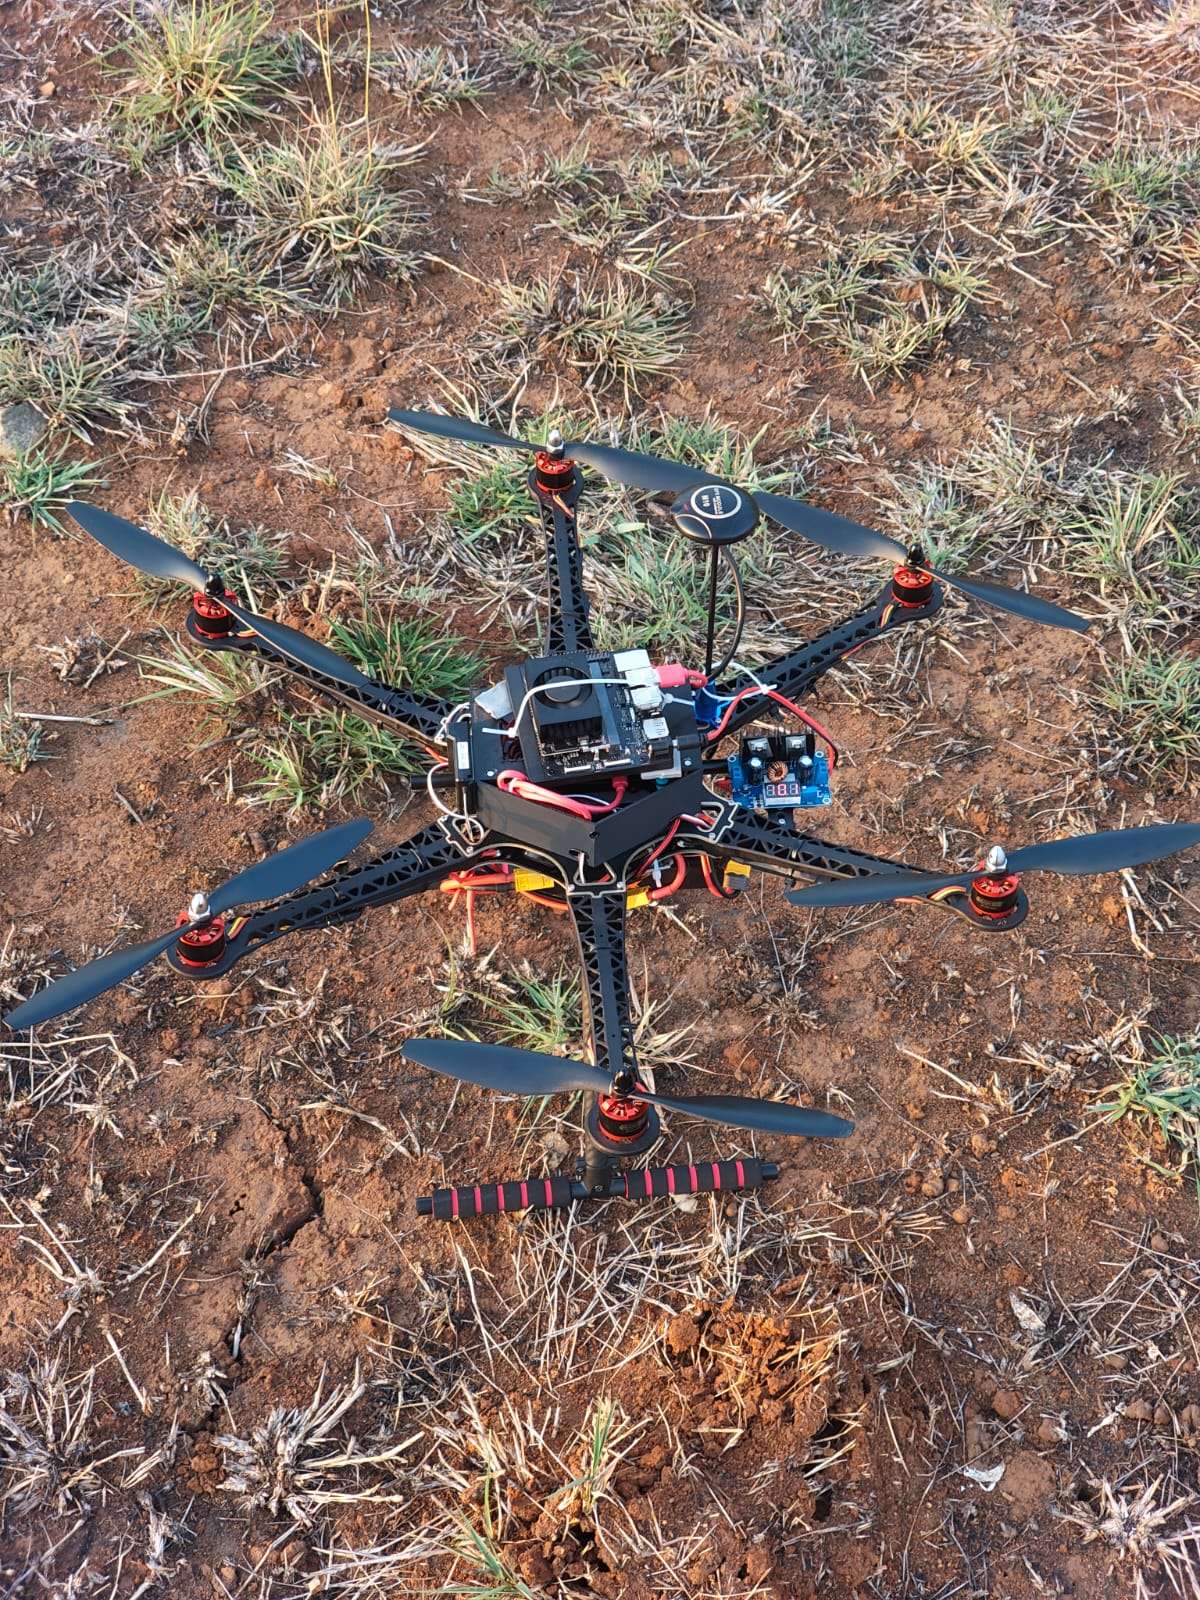
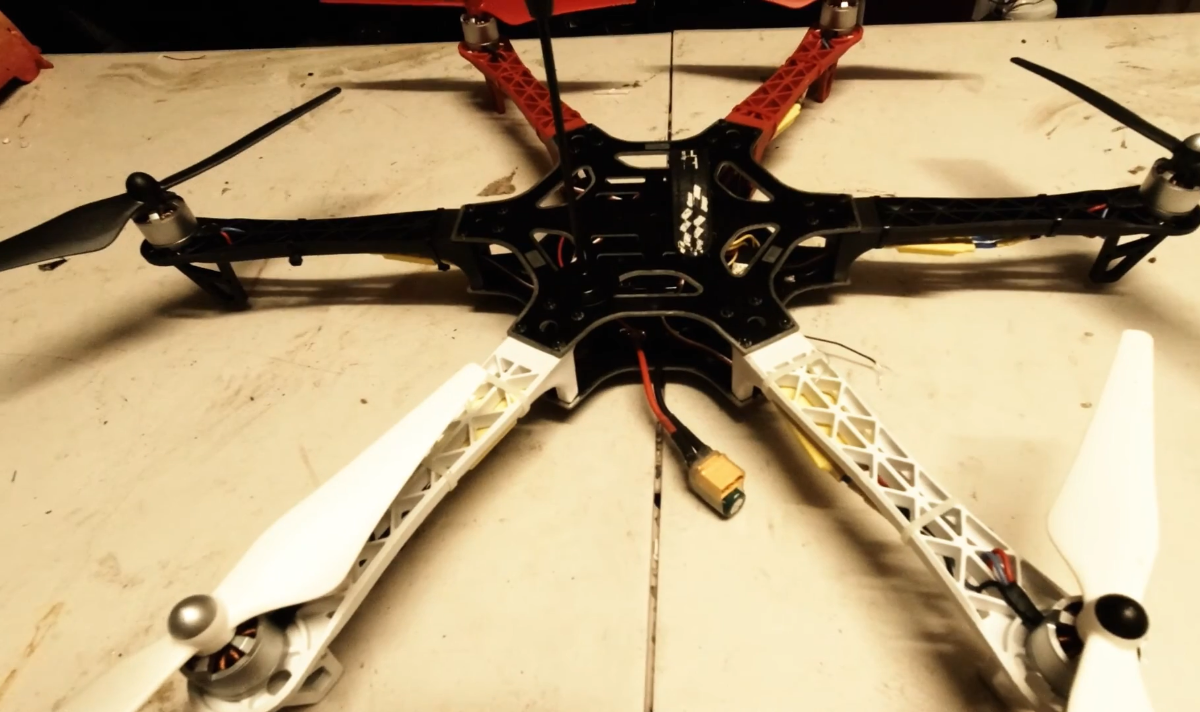
- The Body: We moved from the plastic F450 quadcopter to a larger, glass-fiber S550 Hexacopter frame. The six-rotor design provided stable flight and lift redundancy—if one motor failed, the other five could still land the drone safely.

Chapter 5: Triumph in the Field
The difference was night and day. The S550 frame was incredibly stable, and the Jetson Orin Nano handled the processing loads with ease.
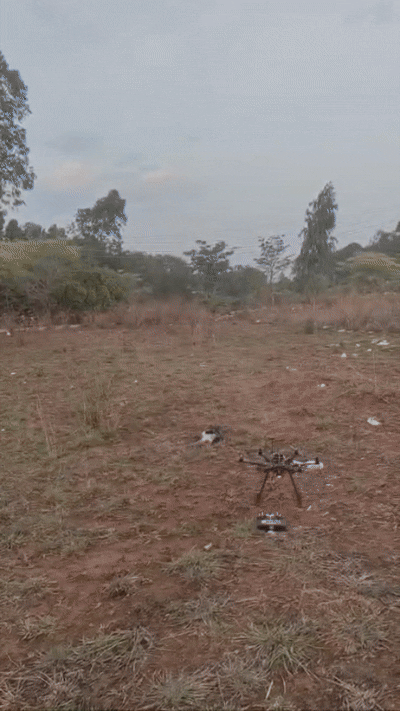
Our first test flight with the upgraded hardware was a straight-line waypoint mission. We placed a large obstacle in the drone's path. As the drone flew forward, the RealSense camera mapped the obstacle, and the Jetson Orin Nano calculated the distance. The state machine triggered: DODGE LEFT. The hexacopter smoothly sidestepped the obstacle by 1.0 meter, flew past it, returned to its path, and completed the mission before landing.
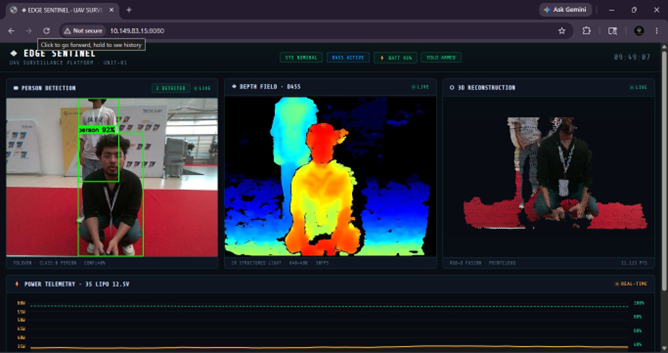
On our second flight, we tested person tracking. The YOLOv8 model ran at a smooth 25 FPS on the Jetson's GPU, locking onto our target with 92% confidence. The Flask dashboard streamed three live video feeds—the tracking view, the colorized depth map, and the 3D point cloud back to our ground station.
Seeing the three live streams run smoothly on our dashboard while the drone navigated obstacles autonomously was the ultimate reward for our months of setbacks, late nights, and troubleshooting. We had taken EdgeSentinel from a shaky prototype to a successful, edge-AI autonomous drone platform.
Chapter 6: Recreating the Sentinel - A Step-by-Step Build Guide
After our successful flight tests, we realized that what we had built wasn't just a single drone—it was a repeatable blueprint for edge-AI flight. If you want to recreate EdgeSentinel, you will go through the same emotional journey we did: the anticipation of unboxing, the stress of the soldering iron, the tension of the first power-up, and the thrill of the first successful compile.
Below is the step-by-step roadmap to building your own Sentinel.
Step 1: Sourcing the Components
The journey begins at your mailbox. Sourcing hardware is a test of patience, budgets, and import tracking. But the day the boxes finally arrive, and you spread them across your workbench, you feel that childhood excitement all over again.
Here is what you need to order to build the S550 platform:
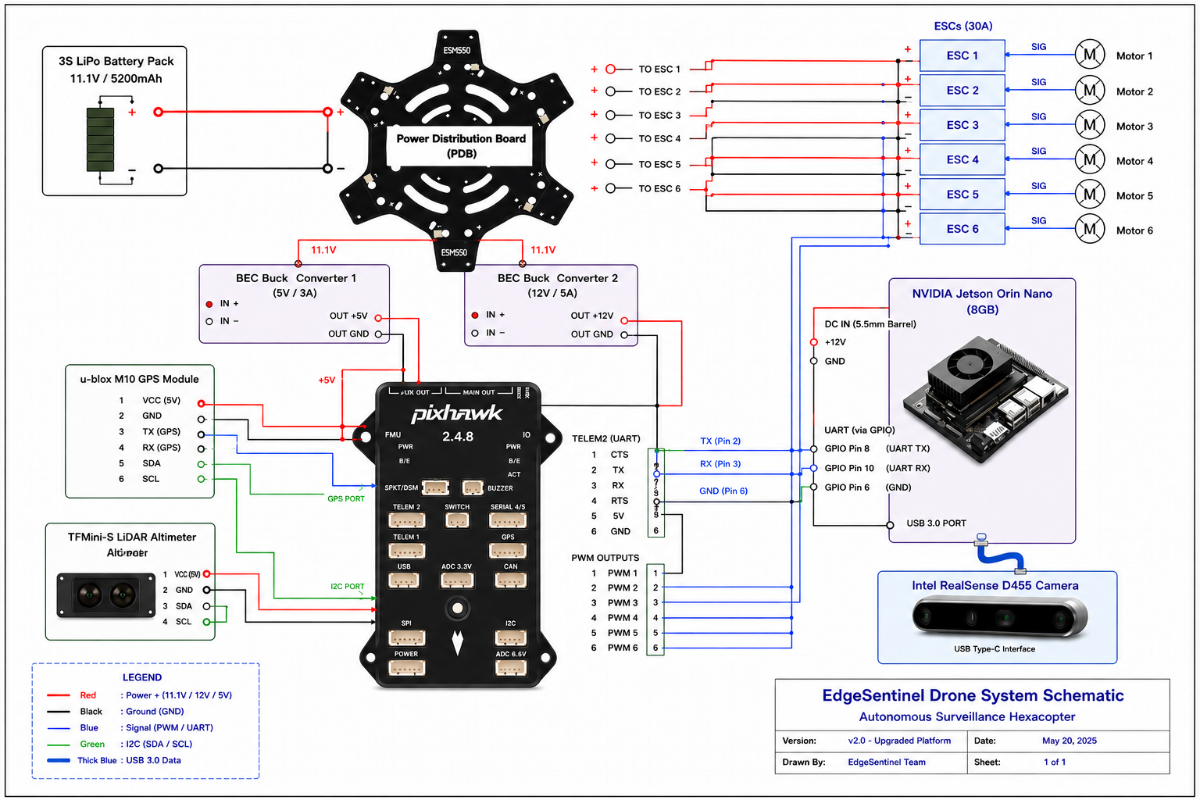
- S550 Hexacopter Frame: Glass-fiber chassis with an integrated Power Distribution Board (PDB).
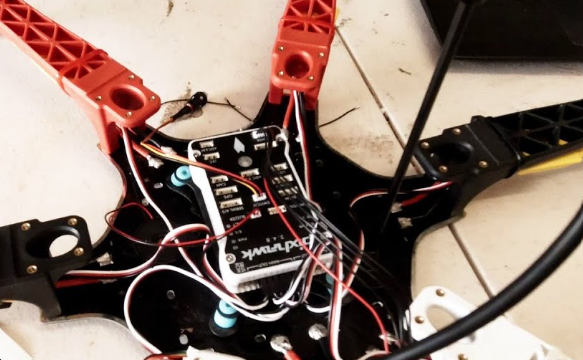
- Pixhawk 2.4.8 Flight Controller: The autopilot running ArduPilot to handle stabilization and GPS navigation.
- u-blox M10 GPS Module: Provides high-precision coordinate data.
- ReadyToSky 2212 920KV Motors (x6): The brushless propulsion systems.
- 40A ESCs (x6): Speed controllers to drive the motors.
- NVIDIA Jetson Orin Nano (8GB): The companion brain executing YOLOv8 and the avoidance loop.
- Intel RealSense D455 Camera: Active IR stereo depth camera to give the drone spatial awareness.
- 3S 5200 mAh LiPo Battery (11.1V): The main flight power plant.
- BEC Buck Converters (x2): Dedicated voltage steps downs (5V/3A for Pixhawk; 12V/5A for Jetson).
- Benewake TFMini-S LiDAR: Laser altimeter for accurate distance-to-ground holding.
- Nylon standoffs & cabling: Structural mounts and serial connectors.
Step 2: The Physical Assembly
Assembling the S550 is a slow, meticulous process. One cold solder joint can cause a crash. When you heat up your soldering iron, take your time:
Soldering the Power Lines: Solder the six 40A ESC power leads directly to the copper pads on the S550 bottom plate's integrated PDB.
.png)
.png)
Mounting the Propulsion: Bolt the six 2212 motors onto the frame arms. Connect them to the ESCs. (Note: Three motors must spin clockwise and three counter-clockwise).
Placing the Autopilot: Secure the Pixhawk 2.4.8 to the center of the frame using double-sided vibration-dampening foam blocks.

Isolating the Brain Power: Solder the BEC buck converters to the main battery pads. Program one buck converter to output 5V/3A to power the Pixhawk, and the second converter to output 12V/5A to power the NVIDIA Jetson Orin Nano. This power isolation prevents companion computer brownouts.
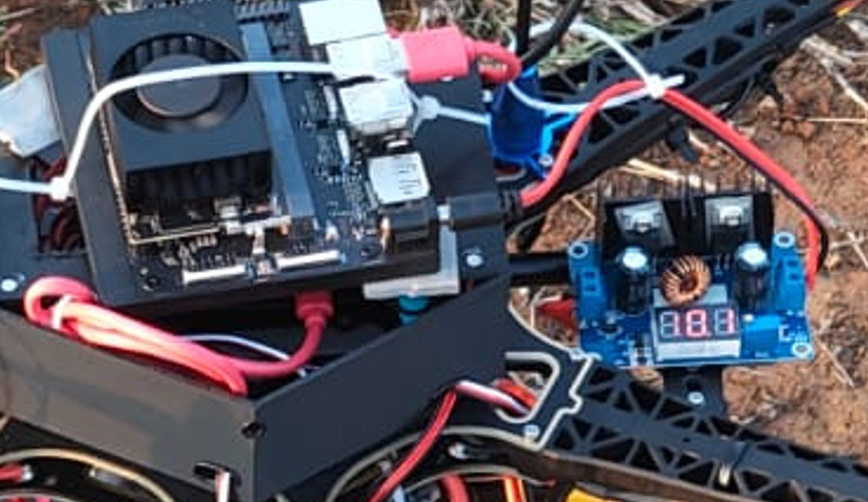
- Mounting the Companions: Secure the Jetson Orin Nano on the top deck using nylon standoffs. Connect the Jetson's serial interface pins (
TX/RX) to the Pixhawk’sTELEM2port. - Positioning the Sensors:
- Mount the M10 GPS on a mast, keeping it high and away from the ESC power cables to avoid magnetic interference on the compass.
- Attach the RealSense D455 camera securely to the front nose bracket, connected to a USB 3.0 port on the Jetson.
- Attach the TFMini-S LiDAR pointing straight down from the bottom plate.
Step 3: The Circuit Connection Guide
To protect the sensitive electronics from power surges and logic brownouts, we designed an isolated power architecture. The following table details the exact pin mapping and wiring:
| Source Device / Pin | Destination Device / Pin | Protocol / Purpose |
|---|---|---|
| 3S LiPo Battery (11.1V) | ESC Power Pads (S550 PDB) | High-current raw motor power |
| 3S LiPo Battery (11.1V) | 5V/3A BEC Input | Voltage step-down for autopilot |
| 3S LiPo Battery (11.1V) | 12V/5A BEC Input | Voltage step-down for companion computer |
| 5V/3A BEC Output | Pixhawk Power Port | Stable 5V logic power |
| 12V/5A BEC Output | Jetson DC Barrel Jack | Stable 12V logic power |
| Jetson UART TX (Pin 8) | Pixhawk TELEM2 RX (Pin 3) | MAVLink Serial Command stream (57600 baud) |
| Jetson UART RX (Pin 10) | Pixhawk TELEM2 TX (Pin 2) | MAVLink Serial Telemetry stream (57600 baud) |
| Jetson GND (Pin 6) | Pixhawk TELEM2 GND (Pin 6) | Ground reference loop |
| Intel RealSense D455 | Jetson USB 3.0 Port | High-bandwidth 3D depth and RGB stream |
| Benewake TFMini-S LiDAR | Pixhawk TELEM1 or I2C Port | Real-time distance-to-ground measurements |
Step 4: Autopilot Calibration
Connect the Pixhawk via USB to a computer running Mission Planner:
- Flash ArduPilot Copter 4.5.x firmware.
- Complete the accelerometer, compass, radio, and ESC calibrations.
- Configure the telemetry port parameters:
SERIAL2_PROTOCOL = 2(MAVLink 2)SERIAL2_BAUD = 57(57600 baud rate)Set stream rates (
SR2_POSITIONandSR2_EXTRA1) to10(10Hz updates).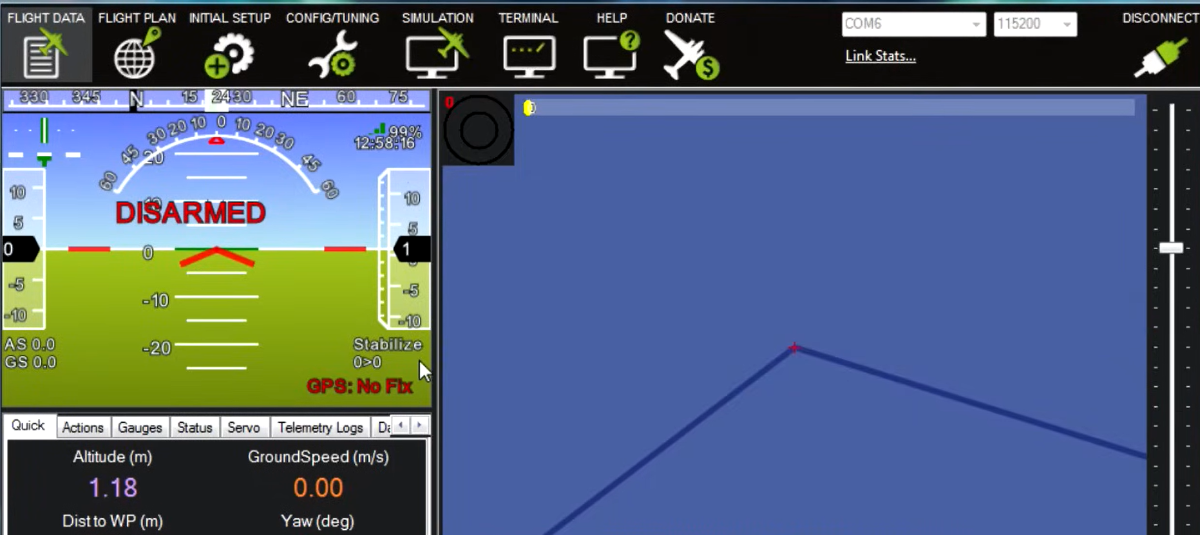
Step 5: Software Setup and Key Codes
Connect to the Jetson Orin Nano via SSH. Clone the repository and configure your Python environment:
Repo Link: https://github.com/Avishkar-byte/EdgeSentinel.git
# Clone the repository

git clone https://github.com/Avishkar-byte/EdgeSentinel.git

cd EdgeSentinel
# Setup the virtual environment
python3 -m venv venv
source venv/bin/activate
# Install the dependencies

pip install -r requirements.txt
Code Segment 1: Pre-Flight Diagnostics (gps_check.py)
This script acts as the flight gatekeeper. It must be run before takeoff to verify EKF stability, GPS 3D lock, and battery levels:
import sys
from dronekit import connect

def run_preflight_checks(connection_string="/dev/ttyACM0", baud_rate=57600):
    print("Connecting to autopilot...")
    vehicle = connect(connection_string, wait_ready=True, baud=baud_rate)

    # 1. Check GPS Fix
    if vehicle.gps_0.fix_type < 3:
        print("[CRITICAL] Waiting for stable 3D GPS Fix...")
        vehicle.close()
        sys.exit(1)

    # 2. Check Battery Voltage
    if vehicle.battery.voltage < 10.5:
        print(f"[CRITICAL] Battery voltage low: {vehicle.battery.voltage}V")
        vehicle.close()
        sys.exit(1)

    print("[SUCCESS] All pre-arm hardware checks passed!")
    vehicle.close()

if __name__ == "__main__":
  run_preflight_checks()
Code Segment 2: Autonomous Obstacle Evasion (obstacle_avoidance.py)
This is the core state machine processing depth zones and executing evasive sidesteps:
import time
import numpy as np
import cv2
import pyrealsense2 as rs
from dronekit import connect, VehicleMode
from pymavlink import mavutil
class AvoidanceSystem:
def __init__(self):
self.vehicle = None
self.state = "MOVE_FORWARD"
def connect_vehicle(self):
self.vehicle = connect("/dev/ttyACM0", wait_ready=True, baud=57600)
def depth_stream_thread(self):
pipeline = rs.pipeline()
config = rs.config()
config.enable_stream(rs.stream.depth, 640, 480, rs.format.z16, 30)
pipeline.start(config)
while True:
frames = pipeline.wait_for_frames()
depth_frame = frames.get_depth_frame()
if not depth_frame: continue
# Slice frame into Left, Center, and Right zones
colorized = np.asanyarray(rs.colorizer().colorize(depth_frame).get_data())
center_zone = colorized[:, 160:479]
hsv = cv2.cvtColor(center_zone, cv2.COLOR_BGR2HSV)
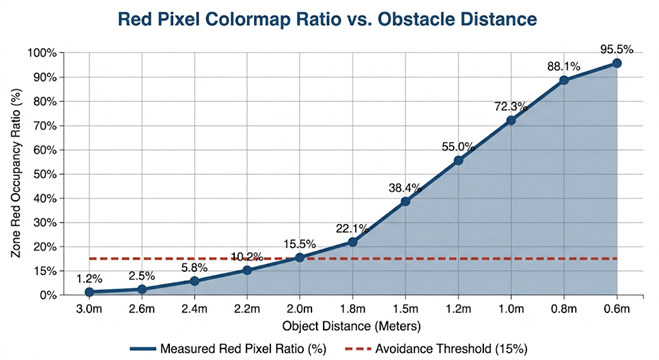
red_mask = cv2.inRange(hsv, (0, 100, 100), (10, 255, 255))
center_red_ratio = np.sum(red_mask > 0) / red_mask.size
if center_red_ratio > 0.15:
# Evasion decision logic goes here
self.state = "DODGE_LEFT"
else:
self.state = "MOVE_FORWARD"
def send_local_velocity(self, vx, vy, vz):
msg = self.vehicle.message_factory.set_position_target_local_ned_encode(
0, 0, 0, mavutil.mavlink.MAV_FRAME_BODY_NED, 0b0000111111000111,
0, 0, 0, vx, vy, vz, 0, 0, 0, 0, 0
)
self.vehicle.send_mavlink(msg)Step 6: Code Architecture and Logic Flows
1. Module Layout
.png)
2. Avoidance Decision Pipeline
.png)
Step 7: Flight Demo Outcome & Video
Our flight demo validates the entire software loop in a single flight: autonomous arming, takeoff to 2.0 meters, detection of a mock wall obstacle, executing a DODGE_LEFT sidestep, returning to path, and carrying out a soft RTL landing.