
Problem Statement:
Traditional monitoring in ICUs is highly dependent on manual tasks by nurses and other medical staff, which are prone to human error, fatigue, and delays, all of which place patients at risk. Any negligence may result in missing critical deterioration and serious complications. This project automates continuous monitoring of vital signs, ML-based alerts, and web-based oversight to eliminate negligence and enhance reliability.
Proposed Solution:
This ESP32-based ICU Monitoring System automates continuous vital signs tracking through the use of three I2C slave modules-Fluid, ECG, and Oximeter+Temp-that perform local processing and report data to a main module. The controller combines 10 features, applies TensorFlow Lite ML for real-time NORMAL/RECOVERY/SERIOUS classification, and automates critical interventions while serving a responsive web dashboard for remote oversight. This removes the gaps in manual monitoring with ML-driven alerts and visualization of live vitals.
- Automated patient monitoring with ML classification
- Fluid and oxygen control with web-based manual override
Key Features:
- Distributed I2C Architecture: Specialized ESP32 modules with local signal processing help in plug and use.
- 10-Vital Fusion: Real-time flow in/out, fluid balance, HR, ECG amplitude, HRV, QRS duration, SpO2, pulse, temperature.
- TensorFlow Lite ML: Edge classification into NORMAL/RECOVERY/SERIOUS with 10s prediction cycles
- Automated Actuation: ML-driven pump & oxygen control + manual web control.
- Responsive Web Dashboard: Live health status, vitals grid, 5s auto-refresh.
Why this Plug & Use system is promoted in this project?
Plug and use system is approached in this project in order to make the system user friendly from the user end i.e. the medical staffs and all. And Afterall all patients do not need the same medical setup or same treatment, so this must be modular.
In this project whatever modules are use are just the basic components or instruments that are commonly used by medical organization when a patient is admitted in ICU.
Why the device is connected to local network, instead of running on Cloud Servers?
The device is connected to a local Wi-Fi network to make the patient data accessible to the Hospital authority only and not on cloud. Also, at a time, multiple devices, can be connected to the same Wi-Fi network for the devices to work locally. This system an work even without the presence of Internet connection because this does not use Internet connection to host the Web Dashboard, instead uses peer-to-peer network like protocol like the ESP NOW protocol but not exactly that.
Benefits of this:
- No Cloud processing
- Each device processed individually (on device processing)
- No patient data can be leaked via the Internet
- Do not require any Internet connection to host
Microcontrollers & Sensors Used:
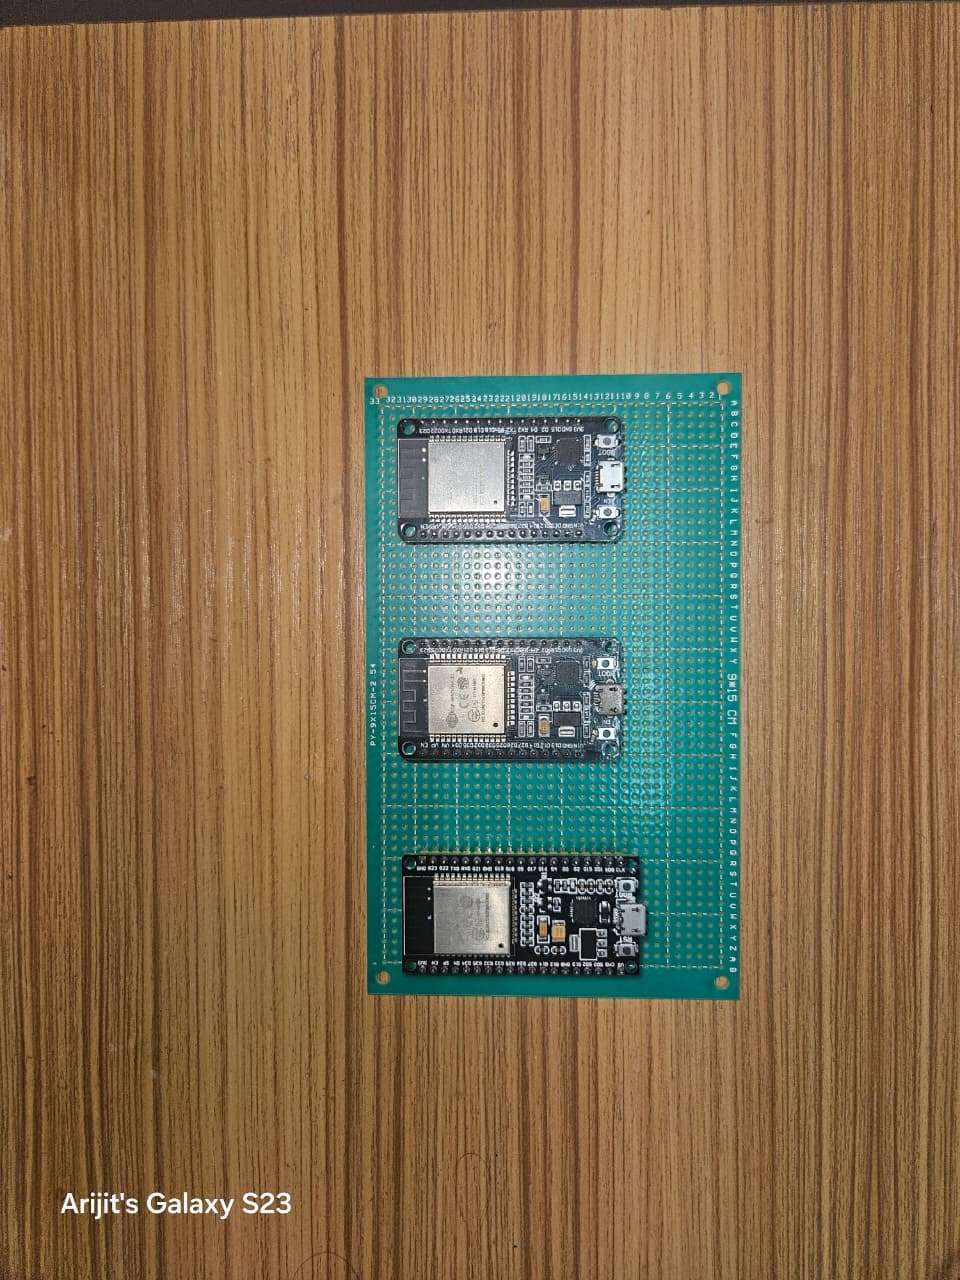
For this project I am making use of three ESP32 Dev boards as three modules for the three different modules. And a ESP32-c6-devkitc that acts as the main module for the project, this module runs the TinyML model, communicates with the three different modules and connect to the WEB Dashboard.
And for controlling the actuators, I am making use of a 6 channel custom hand made relay module (in replacement of a 2 channel relay module of 2 single channel relay module) to control the actuators (the fluid inlet pump and the oxygen control valve). Also I am making use of a buck converter module to control the fluid outlet pump (just to demonstrate the system).

Also for sensing each of the health conditions, I am making use of 2 Flow sensors (for the fluid monitoring of the body), a ECG sensor, a pulse oximeter sensor and a temperature probe.
And for the actuators, I am using 2 pumps (for fluid inlet and out) and a 5v solenoid valve (for oxygen control).
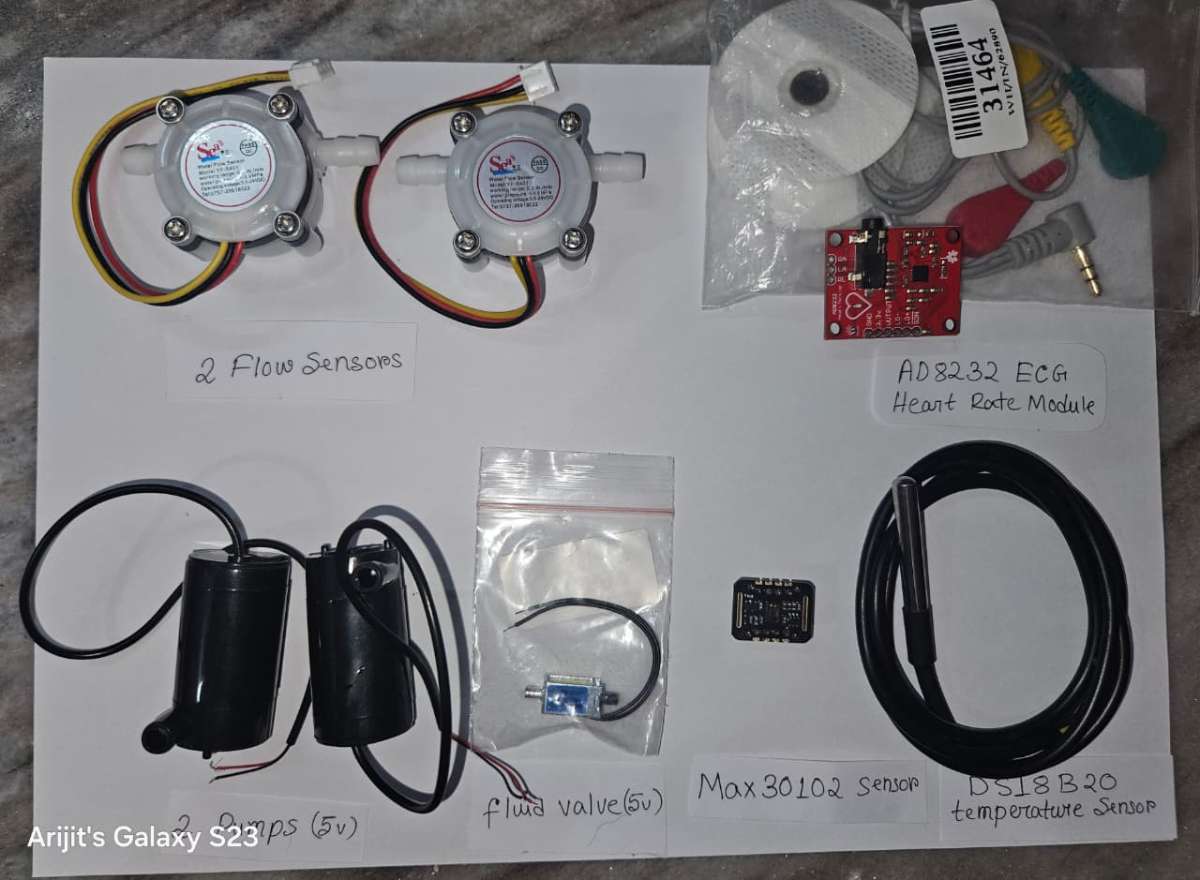
More details about each component is provided in the above component list and the connection diagram can be found in the circuit diagram provided below.
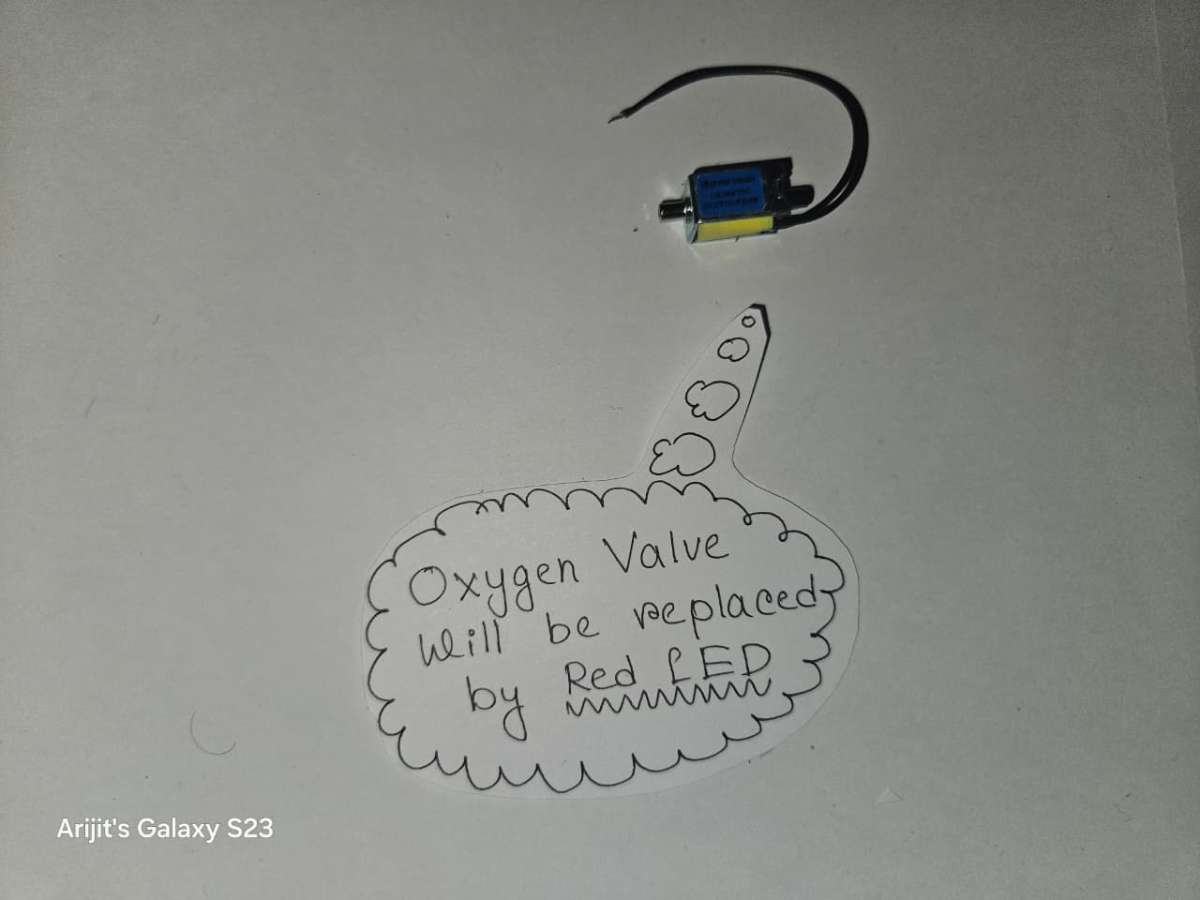
And to mention for the shake of demonstration of the project, I am going to make use of a Red LED to show the reality of switching on and off of the valve, as it is physically impossible to show that in the video
DigiKey My-list
Here are the components I have used for this ICU Guardian Project. I’ve created a custom DigiKey My-List that includes the manufacturer part numbers for each item. You can view the complete list using the link below.
Link:
https://www.digikey.in/en/mylists/list/9G2YC1XXM6
Software used:
For training the Machine Learning Model, the software used is Visual Studio Code (VS Code).
For programming the ESP32C6-DevKitC1 and the ESP32 Dev modules, Arduino IDE is used. Alternatively, PlatformIO can also be used by installing it in the VS Code.
Building The Project:
Step 1: Building the Circuit
1.1 On a 9x15 cm PCB protype board place the three ESP32 Dev board and make approximate making to divide the PCB into three parts accordingly.
1.2 Next cut female header pins for the three ESP32 Dev boards to solder on the PCB.
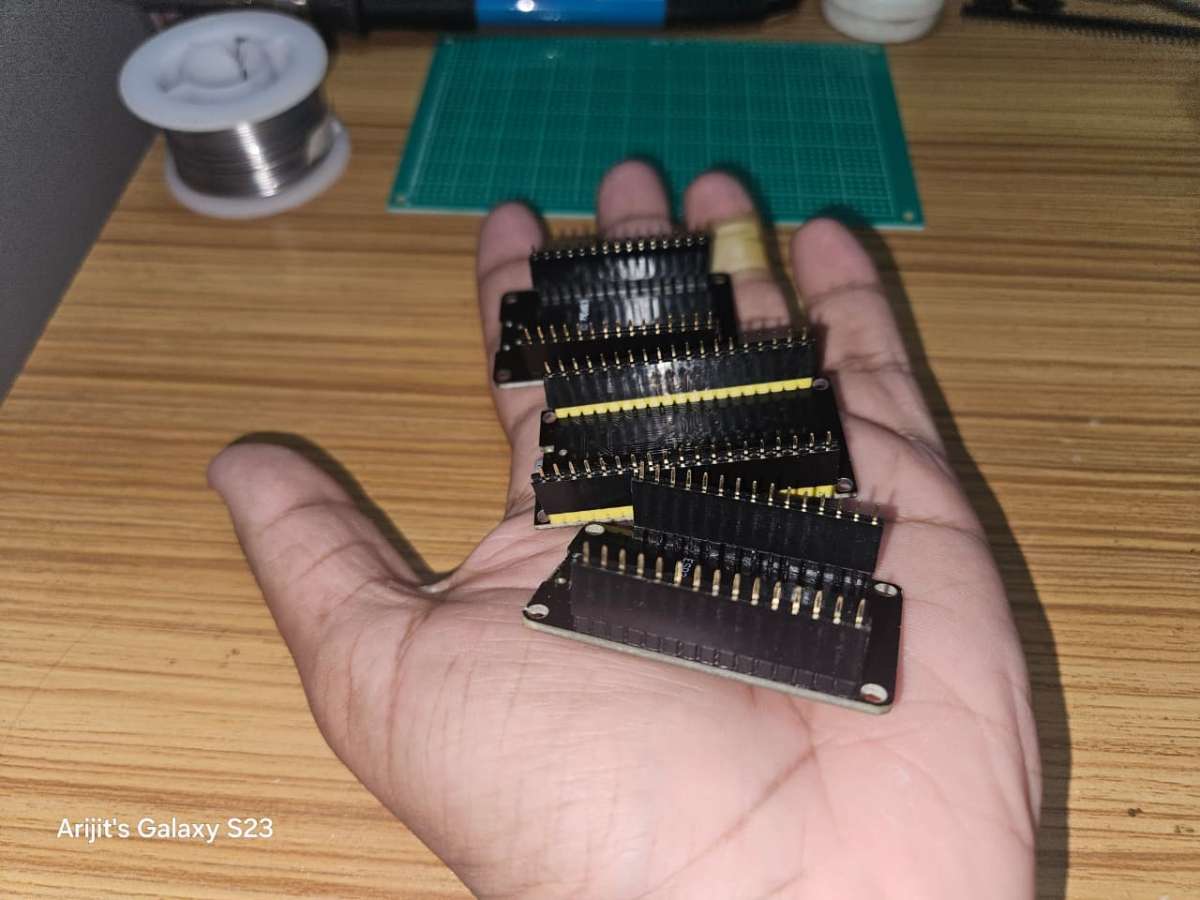
1.3 Solder the three ESP32 Dev boards on the PCB according to the previous markings. Also Solder the respective header pins for each modules.

1.4 Next make connections for each of the three modules one by one and check the connections using a Multimeter to avoid any short circuits or wrong connections as these sensors are quiet sensitive and can easily be damaged.

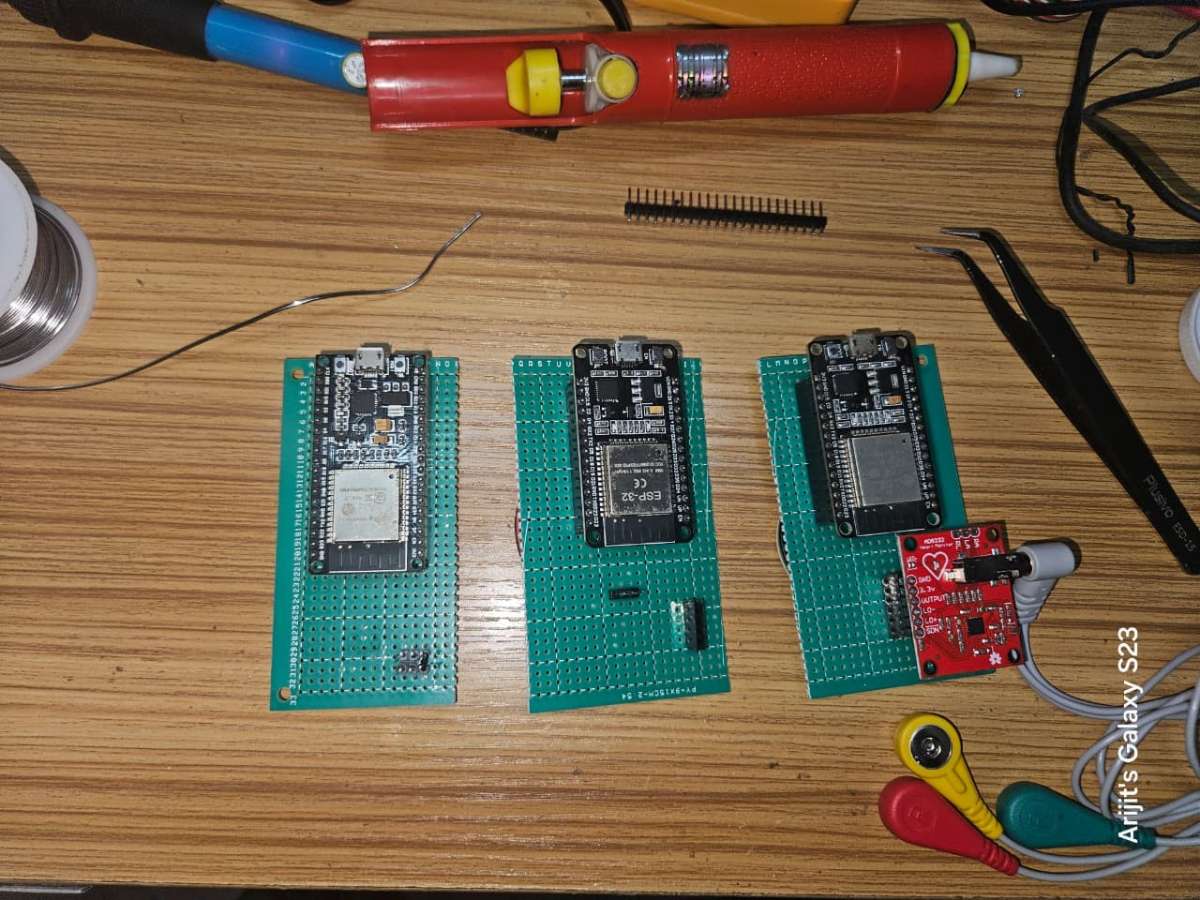
Here is the final look of the three modules after the connections are complete.
1.5 Next for the I2C communications, we need to connect two 10K ohm resistors to the data lines i.e. the SCL and SDA pins to the 3.3v. These two resistors will act as pull-up resistors and will remove any noise while data transfer. Without using the pullup resistors, and just connecting the data pins and the common ground while I tried connecting the connection was there but there were frequent disconnection of the modules or sometimes wrong values come.

I2C communication requires pull-up resistors because it's an open-drain communication protocol, meaning the devices on the bus can only pull the signal line low, not drive it high.

My I2C pull-up resistor connections with the ESP32-c6-devkitc
Circuit Diagram:
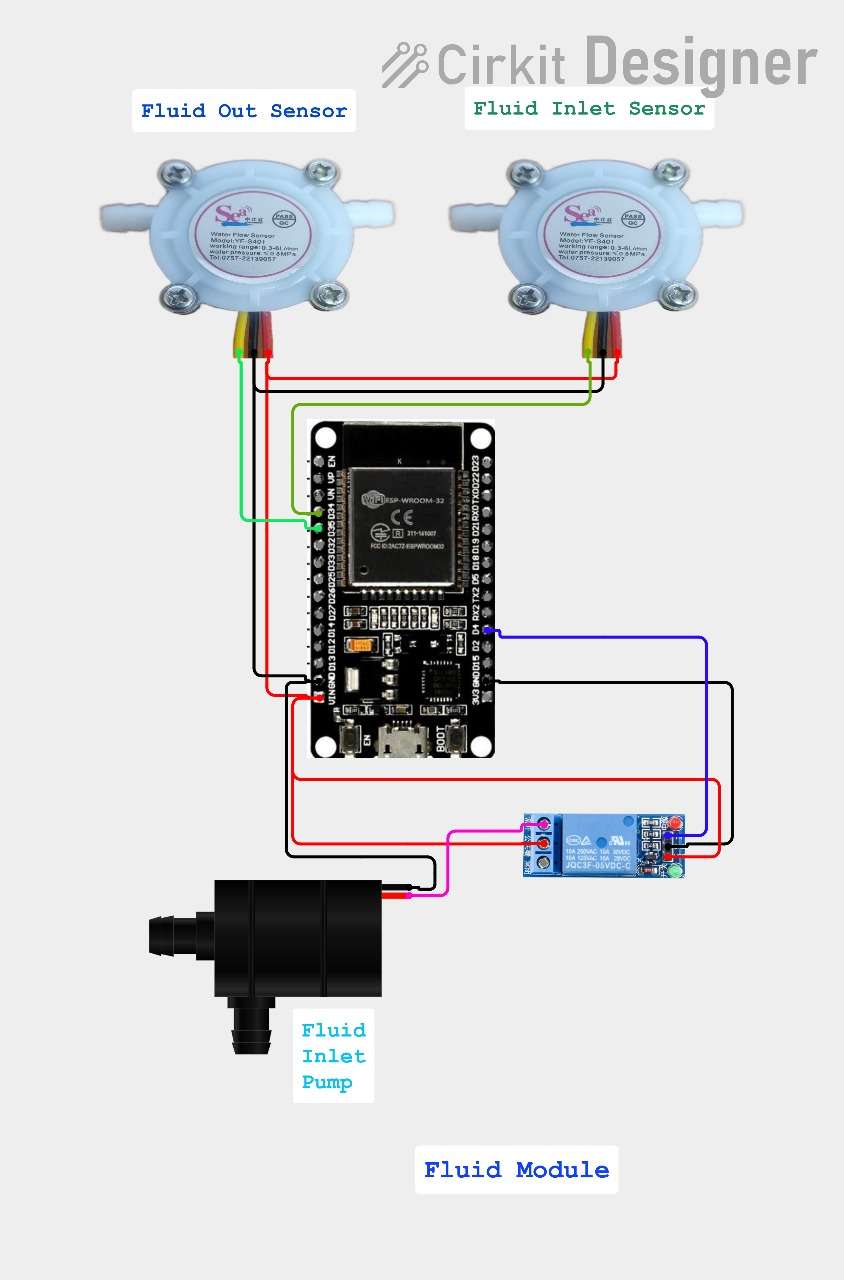
Fluid Module circuit diagram
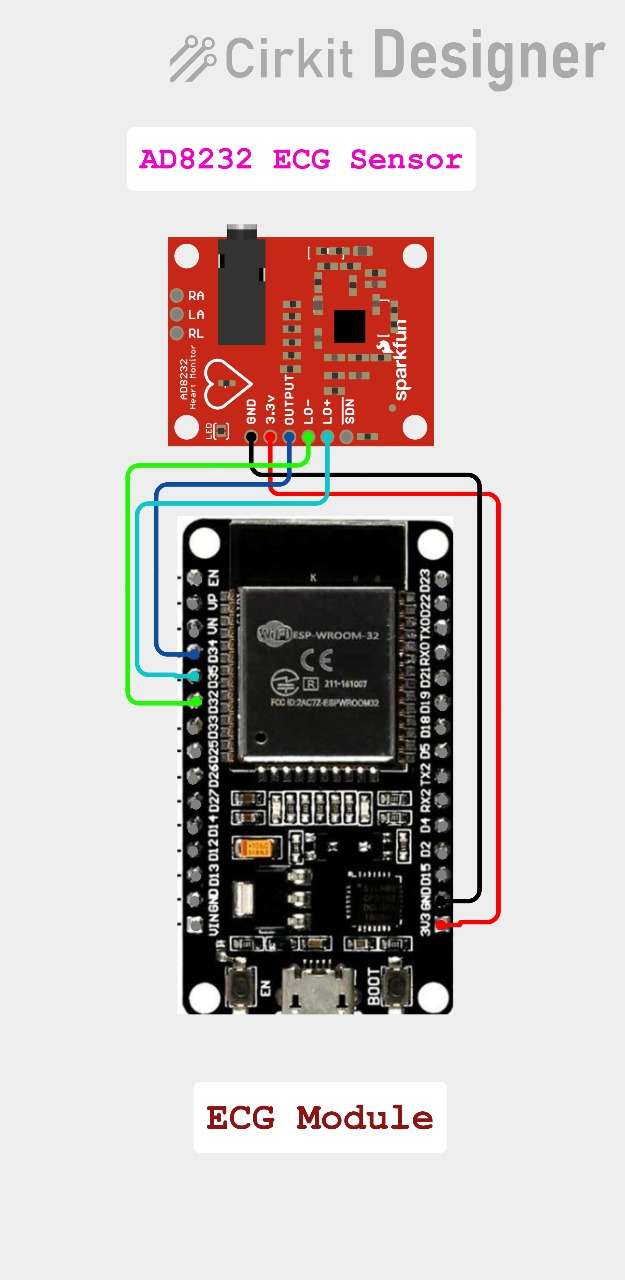
ECG Module circuit diagram

Oximeter & Temperature Module circuit diagram
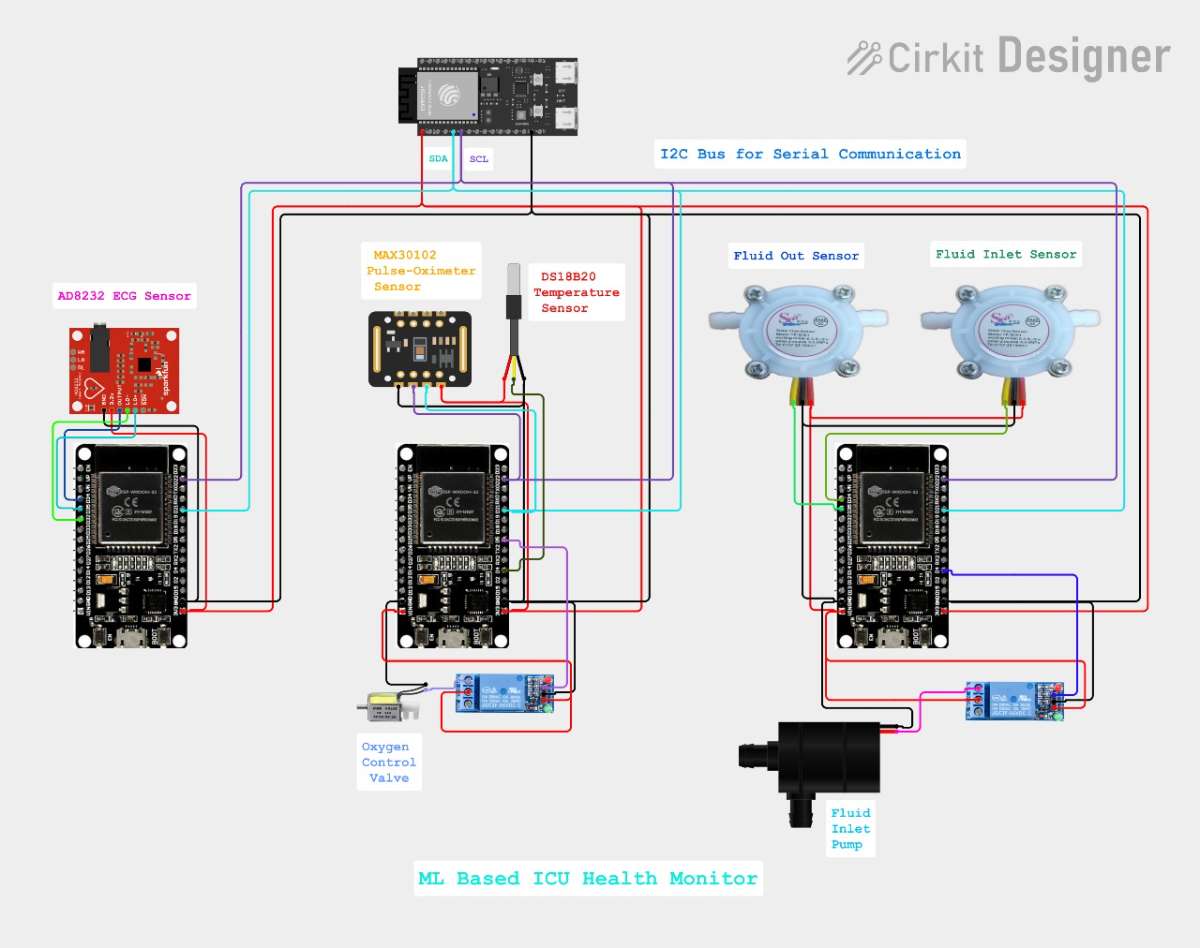
Complete Circuit diagram with all the three modules
Step 2 Creating the Machine Learning model
2.1 Install python in your laptop. I am using Python 3.12.10
2.2 Install These Extensions in VS Code
- Python → Install "Python" by Microsoft
- Pylance → Install "Pylance" by Microsoft
- Jupyter → Install "Jupyter" by Microsoft
Then restart your VS Code once all the extensions are installed successfully.
2.3 Create a CSV file for the training data.
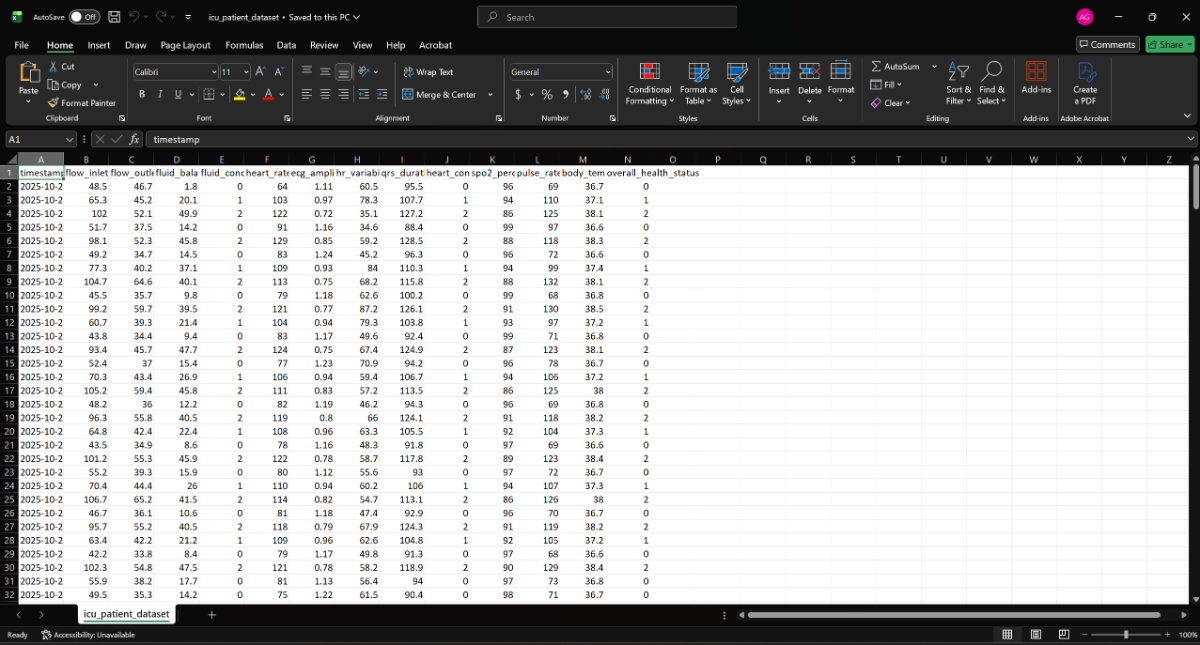
I made created the CSV file by first importing all the training data in the Microsoft Excel and then saving the file as icu_patient_dataset.csv you can see.
Next create the ICU_Monitering folder and copy the same CSV file in the file which we will need while training our Machine Learning model.
2.4 Install Required Packages
In VS Code open the ICU_Monitering folder and then create a new file in the name of install_packages.bat.
Next use the code provided and save it and then run it in you laptop.
@echo off
echo Installing Python packages for ICU Monitoring...
pip install tensorflow
pip install pandas
pip install numpy
pip install scikit-learn
pip install matplotlib
pip install joblib
echo All packages installed successfully!
pause
Note that all packages might not be installed successfully in case the versions mismatches or sometimes newer versions doesn't work. In that case you need to install older versions and try to see which versions work.
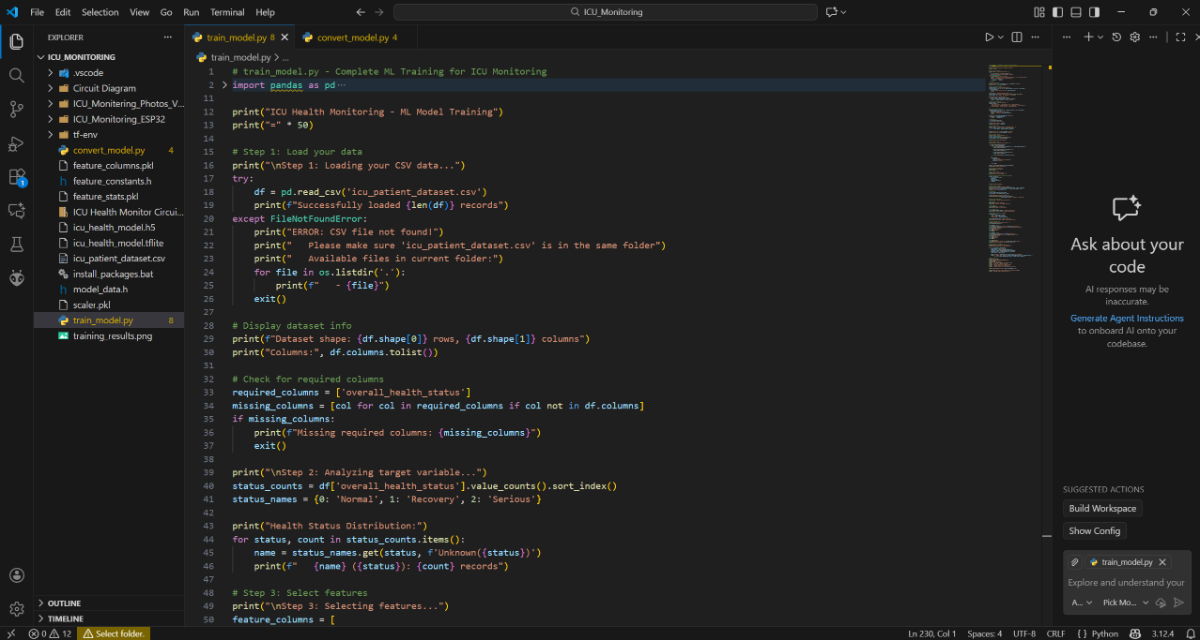
2.5 Run the Training script
For that create a new file in the name of train_model.py in the same folder and then run the code.
# train_model.py - Complete ML Training for ICU Monitoring
import pandas as pd
import numpy as np
import tensorflow as tf
from sklearn.model_selection import train_test_split
from sklearn.preprocessing import StandardScaler
from sklearn.metrics import classification_report, confusion_matrix
import joblib
import matplotlib.pyplot as plt
import os

print("ICU Health Monitoring - ML Model Training")
print("=" * 50)

# Step 1: Load your data
print("\nStep 1: Loading your CSV data...")
try:
    df = pd.read_csv('icu_patient_dataset.csv')
    print(f"Successfully loaded {len(df)} records")
except FileNotFoundError:
    print("ERROR: CSV file not found!")
    print("   Please make sure 'icu_patient_dataset.csv' is in the same folder")
    print("   Available files in current folder:")
    for file in os.listdir('.'):
        print(f"   - {file}")
    exit()

# Display dataset info
print(f"Dataset shape: {df.shape[0]} rows, {df.shape[1]} columns")
print("Columns:", df.columns.tolist())

# Check for required columns
required_columns = ['overall_health_status']
missing_columns = [col for col in required_columns if col not in df.columns]
if missing_columns:
    print(f"Missing required columns: {missing_columns}")
    exit()

print("\nStep 2: Analyzing target variable...")
status_counts = df['overall_health_status'].value_counts().sort_index()
status_names = {0: 'Normal', 1: 'Recovery', 2: 'Serious'}

print("Health Status Distribution:")
for status, count in status_counts.items():
    name = status_names.get(status, f'Unknown({status})')
    print(f"   {name} ({status}): {count} records")

# Step 3: Select features
print("\nStep 3: Selecting features...")
feature_columns = [
    'flow_inlet_ml_min', 'flow_outlet_ml_min', 'fluid_balance_ml',
    'heart_rate_bpm', 'ecg_amplitude_mv', 'hr_variability', 'qrs_duration_ms',
    'spo2_percentage', 'pulse_rate_bpm', 'body_temperature'
]

# Use only available features
available_features = [col for col in feature_columns if col in df.columns]
if len(available_features) < 5:
    print("Not enough features available!")
    print(f"   Available: {available_features}")
    exit()

print(f"Using {len(available_features)} features:")
for feature in available_features:
    print(f"   - {feature}")

# Prepare data
X = df[available_features]
y = df['overall_health_status']

print(f"Features shape: {X.shape}")
print(f"Target shape: {y.shape}")

# Step 4: Split data
print("\nStep 4: Splitting data into train/test sets...")
X_train, X_test, y_train, y_test = train_test_split(
    X, y, test_size=0.2, random_state=42, stratify=y
)

print(f"Training set: {X_train.shape[0]} records")
print(f"Testing set: {X_test.shape[0]} records")

# Step 5: Scale features
print("\nStep 5: Scaling features...")
scaler = StandardScaler()
X_train_scaled = scaler.fit_transform(X_train)
X_test_scaled = scaler.transform(X_test)

print("Features scaled successfully")

# Step 6: Build model
print("\nStep 6: Building neural network...")

def create_simple_model(input_dim):
    model = tf.keras.Sequential([
        tf.keras.layers.Dense(32, activation='relu', input_shape=(input_dim,)),
        tf.keras.layers.Dropout(0.3),

        tf.keras.layers.Dense(16, activation='relu'),
        tf.keras.layers.Dropout(0.3),

        tf.keras.layers.Dense(8, activation='relu'),
        tf.keras.layers.Dropout(0.2),

        tf.keras.layers.Dense(3, activation='softmax')
    ])

    model.compile(
        optimizer='adam',
        loss='sparse_categorical_crossentropy',
        metrics=['accuracy']
    )

    return model

model = create_simple_model(X_train_scaled.shape[1])
print("Model created successfully!")

# Display model architecture
print("\nModel Architecture:")
model.summary()

# Step 7: Train model
print("\nStep 7: Training model...")
print("This may take 1-2 minutes...")

# Simple training without callbacks for beginners
history = model.fit(
    X_train_scaled, y_train,
    epochs=50,
    batch_size=16,
    validation_split=0.2,
    verbose=1
)

print("Training completed!")

# Step 8: Evaluate model
print("\nStep 8: Evaluating model performance...")
test_loss, test_accuracy = model.evaluate(X_test_scaled, y_test, verbose=0)
print(f"Test Accuracy: {test_accuracy:.4f} ({test_accuracy*100:.2f}%)")
print(f"Test Loss: {test_loss:.4f}")

# Predictions
y_pred = model.predict(X_test_scaled)
y_pred_classes = np.argmax(y_pred, axis=1)

print("\nDetailed Classification Report:")
print(classification_report(y_test, y_pred_classes,
                          target_names=['Normal', 'Recovery', 'Serious']))

# Step 9: Save everything
print("\nStep 9: Saving model and artifacts...")

# Save model
model.save('icu_health_model.h5')
print("Model saved as 'icu_health_model.h5'")

# Save scaler
joblib.dump(scaler, 'scaler.pkl')
print("Scaler saved as 'scaler.pkl'")

# Save feature list
joblib.dump(available_features, 'feature_columns.pkl')
print("Feature columns saved as 'feature_columns.pkl'")

# Save feature statistics for ESP32
feature_stats = {
    'means': scaler.mean_.tolist(),
    'stds': scaler.scale_.tolist(),
    'feature_names': available_features
}
joblib.dump(feature_stats, 'feature_stats.pkl')
print("Feature statistics saved as 'feature_stats.pkl'")

# Create training plot
print("\nCreating training history plot...")
plt.figure(figsize=(10, 4))

plt.subplot(1, 2, 1)
plt.plot(history.history['accuracy'], label='Training Accuracy')
plt.plot(history.history['val_accuracy'], label='Validation Accuracy')
plt.title('Model Accuracy')
plt.ylabel('Accuracy')
plt.xlabel('Epoch')
plt.legend()

plt.subplot(1, 2, 2)
plt.plot(history.history['loss'], label='Training Loss')
plt.plot(history.history['val_loss'], label='Validation Loss')
plt.title('Model Loss')
plt.ylabel('Loss')
plt.xlabel('Epoch')
plt.legend()

plt.tight_layout()
plt.savefig('training_results.png', dpi=300, bbox_inches='tight')
print("Training plot saved as 'training_results.png'")

# Step 10: Test with samples
print("\nStep 10: Testing with sample data...")
print("Sample predictions (first 5 records):")

for i in range(min(5, len(X_test))):
    sample_data = X_test.iloc[i:i+1]
    sample_scaled = scaler.transform(sample_data)
    prediction = model.predict(sample_scaled, verbose=0)
    predicted_class = np.argmax(prediction, axis=1)[0]
    actual_class = y_test.iloc[i]

    match = "Match" if predicted_class == actual_class else "Mismatch"
    print(f"   Sample {i+1}: Predicted {status_names[predicted_class]} ({predicted_class}) "
          f"- Actual {status_names[actual_class]} ({actual_class}) {match}")

# Final summary
print("\n" + "="*50)
print("TRAINING COMPLETED SUCCESSFULLY!")
print("="*50)
print("\nGenerated Files:")
print("   icu_health_model.h5 - Main model file")
print("   scaler.pkl - Feature scaler")
print("   feature_columns.pkl - Feature names")
print("   feature_stats.pkl - Statistics")
print("   training_results.png - Training history plot")

print(f"\nFinal Model Accuracy: {test_accuracy*100:.2f}%")

print("\nNext step: Run 'convert_model.py' to prepare for ESP32")
print("   Command: python convert_model.py")
If all the previous steps are done correctly, the code will execute successfully. This can take 2 to 10 minutes depending on the laptop specifications and laptop speed.
.jpg)
In my case even though I had almost the best hardware it took me almost 5 minutes just because I did not provide proper air circulation to the laptop exhaust, thereby increasing the laptop temperature to almost 90 degrees.
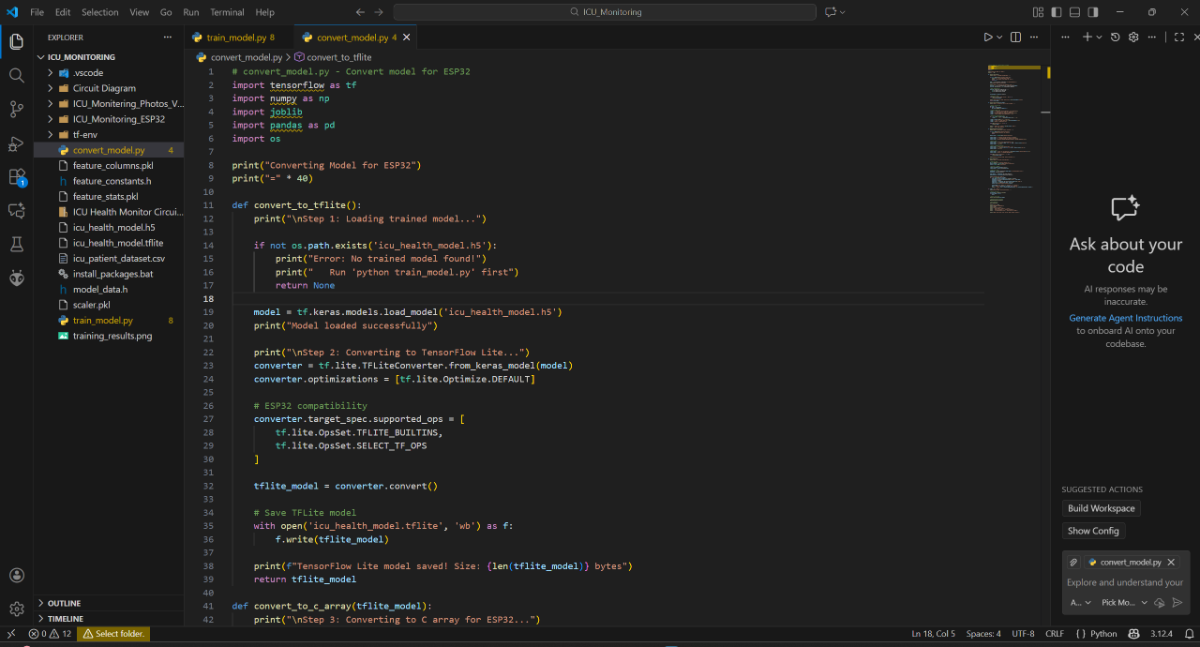
2.6 Run the Conversion script
For that create a new file in the name of convert_model.py in the same folder and then run the code.
# convert_model.py - Convert model for ESP32
import tensorflow as tf
import numpy as np
import joblib
import pandas as pd
import os

print("Converting Model for ESP32")
print("=" * 40)

def convert_to_tflite():
    print("\nStep 1: Loading trained model...")

    if not os.path.exists('icu_health_model.h5'):
        print("Error: No trained model found!")
        print("   Run 'python train_model.py' first")
        return None

    model = tf.keras.models.load_model('icu_health_model.h5')
    print("Model loaded successfully")

    print("\nStep 2: Converting to TensorFlow Lite...")
    converter = tf.lite.TFLiteConverter.from_keras_model(model)
    converter.optimizations = [tf.lite.Optimize.DEFAULT]

    # ESP32 compatibility
    converter.target_spec.supported_ops = [
        tf.lite.OpsSet.TFLITE_BUILTINS,
        tf.lite.OpsSet.SELECT_TF_OPS
    ]

    tflite_model = converter.convert()

    # Save TFLite model
    with open('icu_health_model.tflite', 'wb') as f:
        f.write(tflite_model)

    print(f"TensorFlow Lite model saved! Size: {len(tflite_model)} bytes")
    return tflite_model

def convert_to_c_array(tflite_model):
    print("\nStep 3: Converting to C array for ESP32...")

    # Convert to hex array
    hex_array = []
    for byte in tflite_model:
        hex_array.append(f"0x{byte:02x}")

    # Create C header file
    c_code = "// ICU Health Monitoring Model - Auto-generated\n"
    c_code += "// TensorFlow Lite model for ESP32\n\n"
    c_code += "#ifndef MODEL_DATA_H\n#define MODEL_DATA_H\n\n"
    c_code += "const unsigned char model_data[] = {\n"

    # Format with 12 bytes per line
    for i in range(0, len(hex_array), 12):
        c_code += "    " + ", ".join(hex_array[i:i+12]) + ",\n"

    c_code = c_code.rstrip(",\n") + "\n};\n\n"
    c_code += f"const int model_data_len = {len(tflite_model)};\n\n"
    c_code += "#endif // MODEL_DATA_H\n"

    with open('model_data.h', 'w') as f:
        f.write(c_code)

    print(f"C header file created: {len(hex_array)} bytes")
    print("   File: model_data.h")

def generate_arduino_constants():
    print("\nStep 4: Generating Arduino constants...")

    if not os.path.exists('feature_stats.pkl'):
        print("Feature statistics not found!")
        return

    feature_stats = joblib.load('feature_stats.pkl')

    arduino_code = "// Feature scaling constants for ESP32\n"
    arduino_code += "// Auto-generated from Python training\n\n"
    arduino_code += "#ifndef FEATURE_CONSTANTS_H\n#define FEATURE_CONSTANTS_H\n\n"

    # Feature means
    arduino_code += "const float feature_means[] = {\n    "
    arduino_code += ", ".join([f"{mean:.6f}f" for mean in feature_stats['means']])
    arduino_code += "\n};\n\n"

    # Feature standard deviations
    arduino_code += "const float feature_stds[] = {\n    "
    arduino_code += ", ".join([f"{std:.6f}f" for std in feature_stats['stds']])
    arduino_code += "\n};\n\n"

    # Feature count
    arduino_code += f"const int num_features = {len(feature_stats['feature_names'])};\n\n"
    arduino_code += "#endif // FEATURE_CONSTANTS_H\n"

    with open('feature_constants.h', 'w') as f:
        f.write(arduino_code)

    print("Arduino constants saved: feature_constants.h")

def test_conversion():
    print("\nStep 5: Testing converted model...")

    # Load test data
    df = pd.read_csv('icu_patient_dataset.csv')
    feature_columns = joblib.load('feature_columns.pkl')
    scaler = joblib.load('scaler.pkl')

    # Test with 2 samples
    X_test = df[feature_columns].iloc[:2]
    X_test_scaled = scaler.transform(X_test)

    # Load TFLite model
    interpreter = tf.lite.Interpreter(model_path='icu_health_model.tflite')
    interpreter.allocate_tensors()

    input_details = interpreter.get_input_details()
    output_details = interpreter.get_output_details()

    print("Testing TFLite model:")
    for i in range(len(X_test_scaled)):
        input_data = X_test_scaled[i:i+1].astype(np.float32)
        interpreter.set_tensor(input_details[0]['index'], input_data)
        interpreter.invoke()
        output_data = interpreter.get_tensor(output_details[0]['index'])
        prediction = np.argmax(output_data, axis=1)[0]
        actual = df['overall_health_status'].iloc[i]

        status_names = {0: 'Normal', 1: 'Recovery', 2: 'Serious'}
        match = "Match" if prediction == actual else "Mismatch"
        print(f"   Sample {i+1}: {status_names[prediction]} vs {status_names[actual]} {match}")

if __name__ == "__main__":
    print("Starting model conversion process...")

    # Convert to TFLite
    tflite_model = convert_to_tflite()
    if tflite_model is None:
        exit()

    # Convert to C array
    convert_to_c_array(tflite_model)

    # Generate Arduino constants
    generate_arduino_constants()

    # Test conversion
    test_conversion()

    print("\n" + "="*40)
    print("CONVERSION COMPLETED!")
    print("="*40)
    print("\nFiles for ESP32:")
    print("   model_data.h - Model as C array")
    print("   feature_constants.h - Scaling constants")
    print("   icu_health_model.tflite - TensorFlow Lite model")

    print("\nNext: Copy these files to your ESP32 Arduino project")
This will take less time approximately 1-2 minutes.
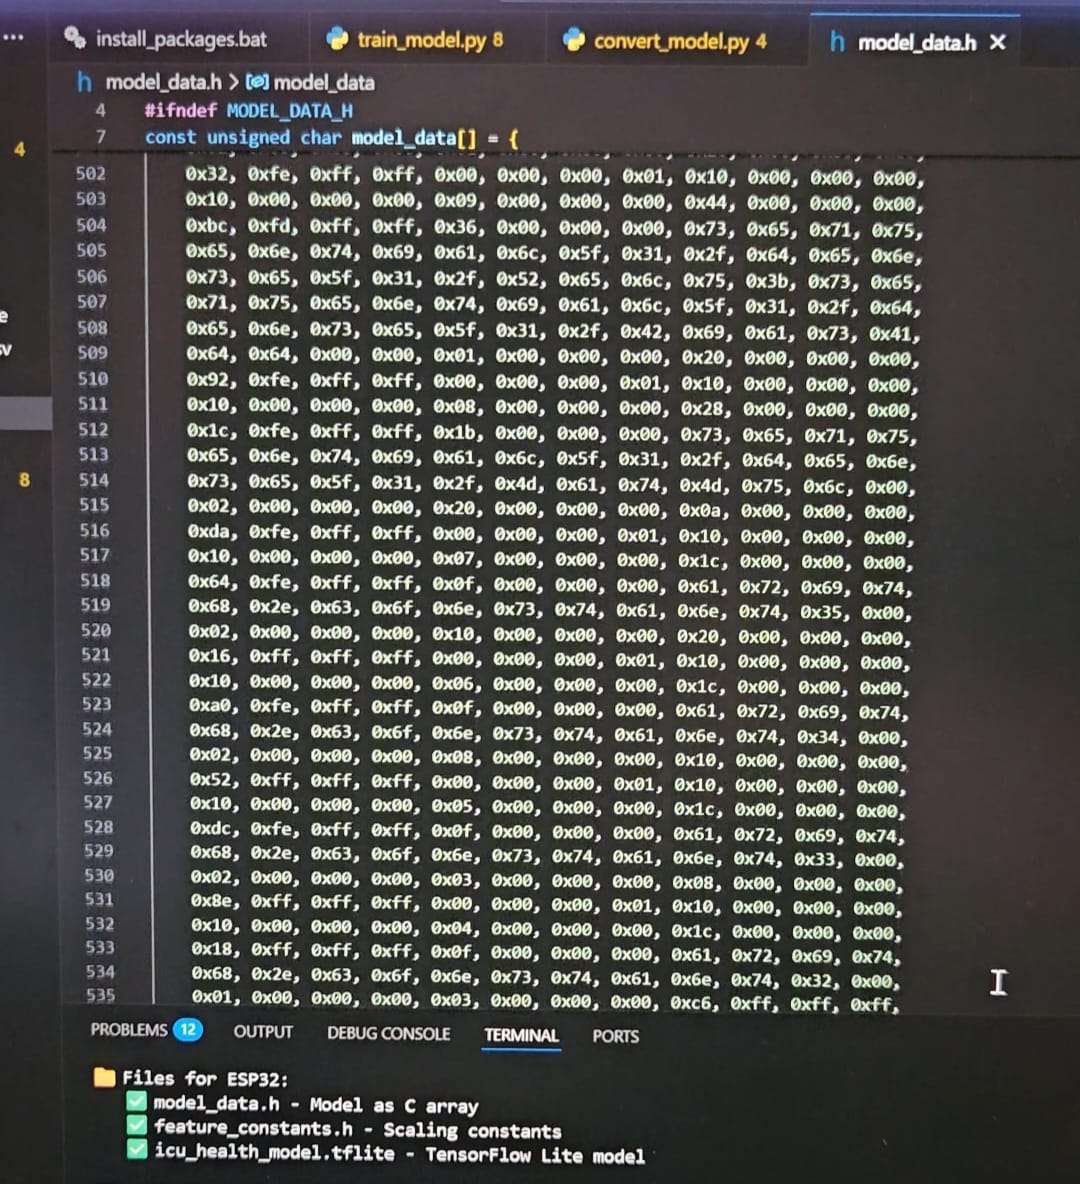
Once all both the files execute successfully, it will generate the trained model.
The important files that are necessary for the ESP32C6-devkitc1 code are:
model_data.hfeature_constants.h
Step 3 Programming the ESP32 modules
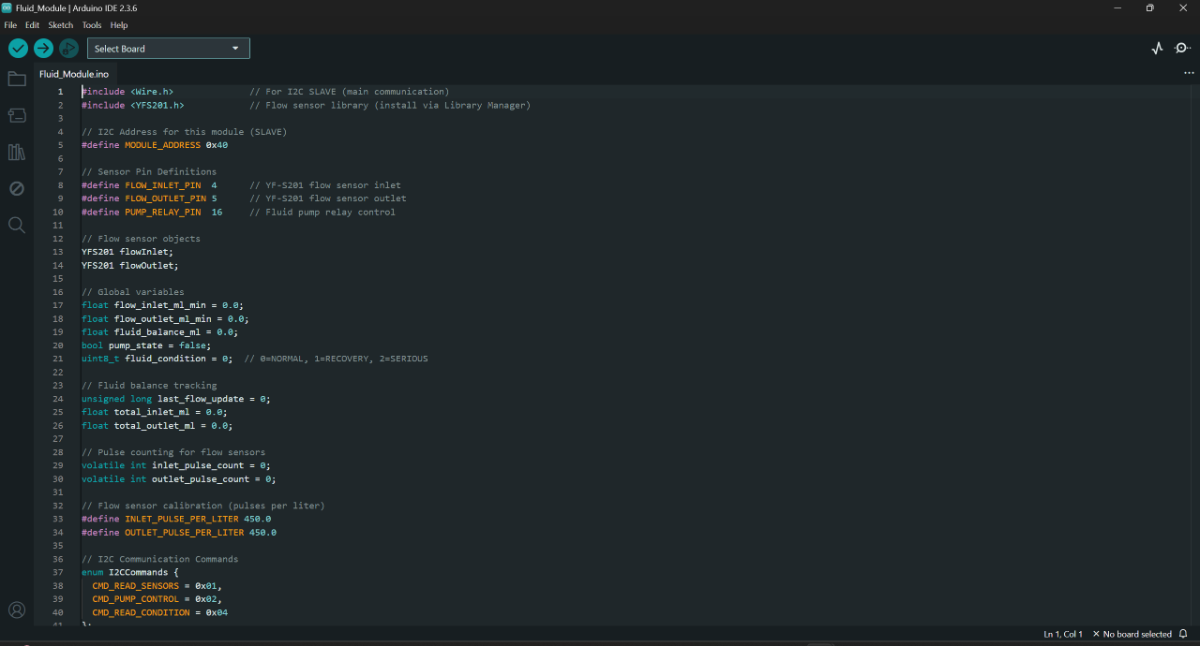
3.1 Fluid Module
The (Fluid_Module.ino) checks the fluid intake/ out of the body, calculated the fluid balance and finally communicates with the Main module via I2C to send the sensor data and to receive the pump relay control signals from the main module.
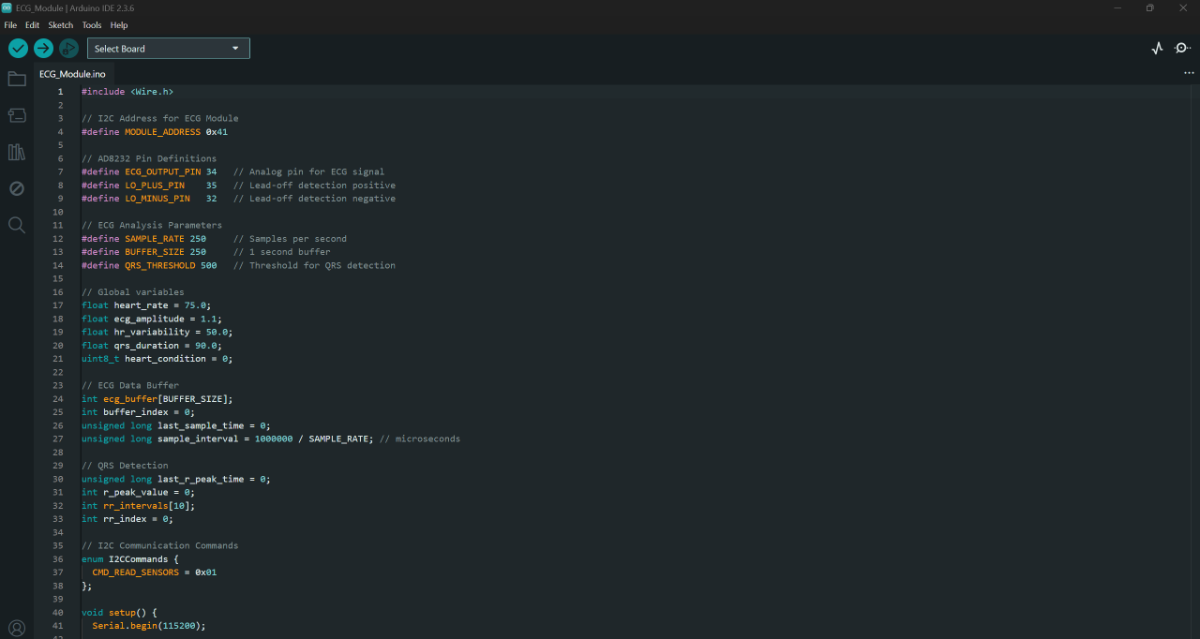
3.2 ECG Module
The ECG Module (ECG_Module.ino) just checks the ECG signals and calculates the heart rate, ecg amplitude, hr variability and qrs duration using the formulas. Then just sends the signal to the Main module.
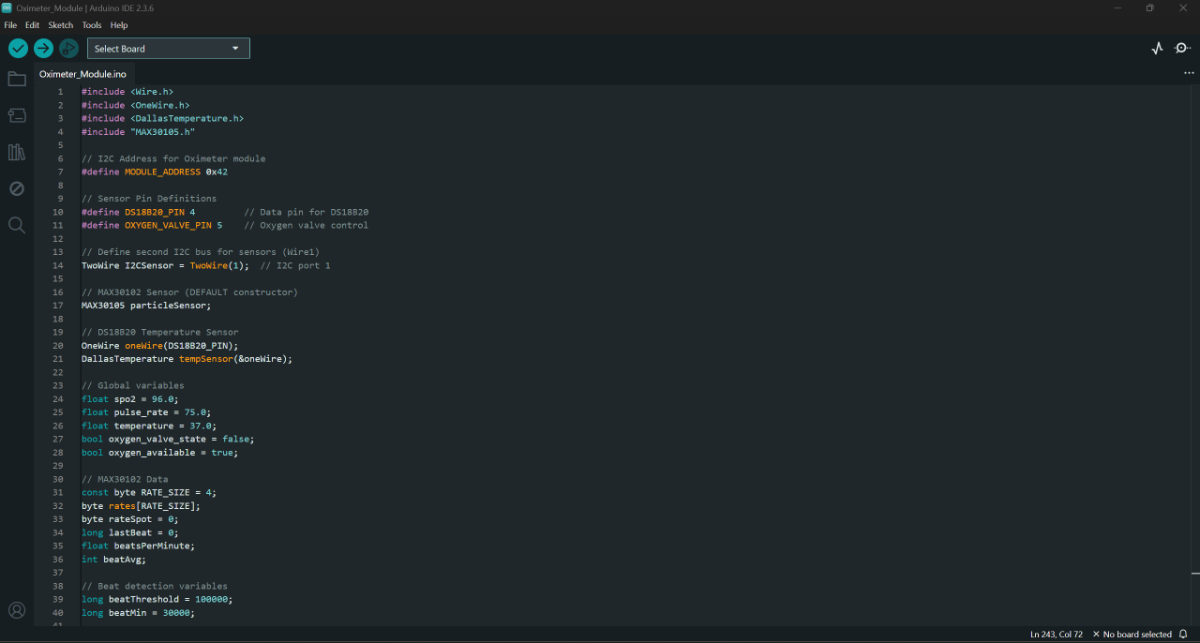
3.3 Oximeter & Temperature Module
The Oximeter & Temperature Module (Oximeter_Module.ino) reads the MAX30102 sensor data connected via I2C and calculates the SPO2 level and heart rate. And also captures the temperature readings. Then sends the sensor data to the Main module via I2C. Later also receives the Oxygen control relay module signal from the Main module.
3.4 Main Module (ESP32 C6-DevKitC 1)
The Main Module (ICU_Monitoring_ESP32.ino) is the brain or the control system of the whole setup. It is the module that runs the Tiny ML model, connects to the Wi-Fi for wireless monitoring and control of the Patient and finally communicated with the three modules for data collections and actuator controls. This is designed so the system works as a plug and use device without much technical knowledge. This is just a protype version of that.
Before the code, it is to be made clear that the two files model_data.h and feature_constants.h created while training the model will be used here. So After saving the code, we need to copy these two files from the main ICU_Monitering folder and need to be here in the ICU_Monitoring_ESP32 folder where the code is present, order the code to work.
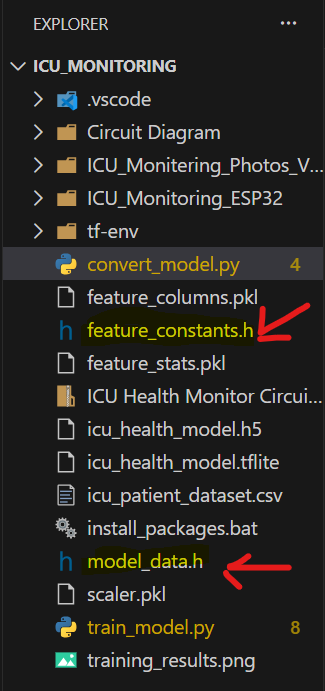
The two marked files
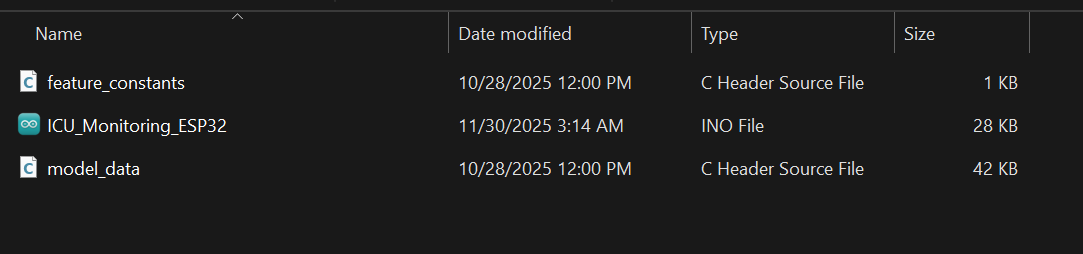
Same as show here
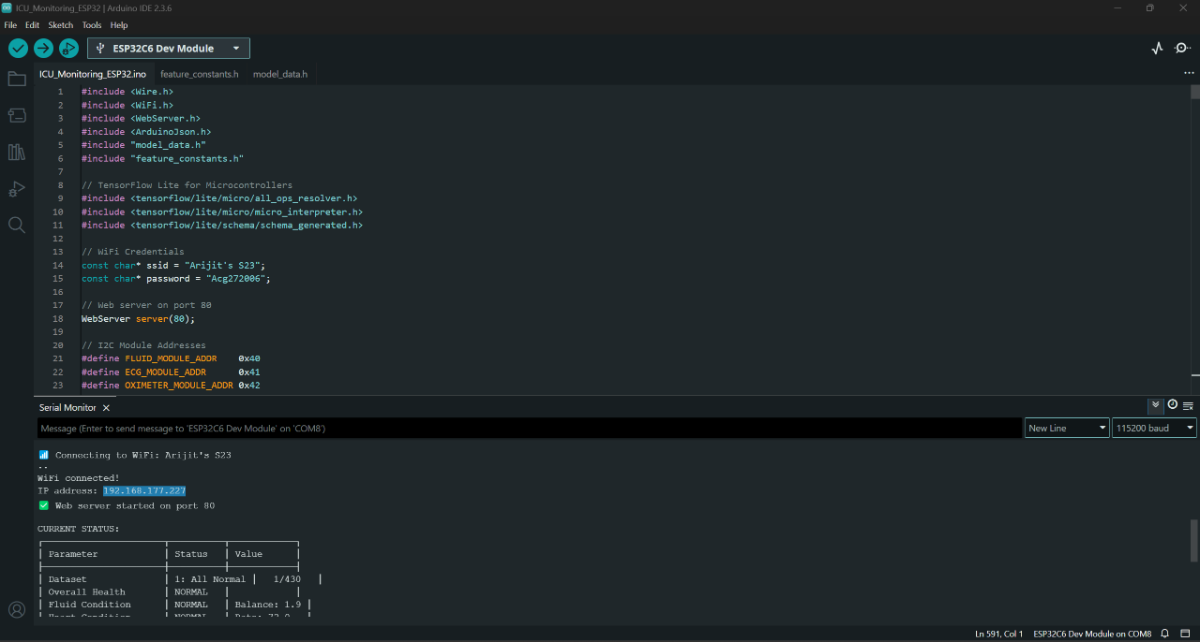
Once the code is uploaded, we will find the IP address in the serial monitor
Step 4: Setup all the three Modules with the Main module
4.1 Connect all the sensors to each of the Modules

Fluid Module

ECG Module

Oximeter & Temperature Module (For this module the MAX30102 might not be recognized if connections are not proper, even if the module gets disconnected in the middle, the board must be reset in order for the module to be recognized by the ESP32 Dev board as the module works on I2C communication)
4.2 Connect each Module to the Main Module via I2C
Connect each of the power lines (3.3 v) to the ESPP32C6-DevKitC1 3.3 v, ground to the ground and the data lines i.e. the SCL and SDA lines respectively. The pull-up resistors are connected to the ESP32C6-DevKitC1 data lines and the 3.3 v.

This is the final look of the project after connection
Step 5: Connection of the pump and the flow sensors
Connect one of the pump with a flow sensor using silicon pipe and the same for the other. The Fluid Intake pump is automatically controlled, i.e. it has 2 modes one is in off position according to the code and the other is on position. But the pump is not turned off in any of the times, instead in off position, the pump is powered with 5v DC, where as in the case of on position, the pump is switched to 7.5 v DC using the relay module.
Although the fluid out in a human body is not in our control, but for the shake of demonstrating the project, the Fluid out pump is controlled manually using a buck converter module to test the whole system.

Pump and Flow sensor setup
Demonstration of the Project
The final project

This project cannot be demonstrated just by using images, but requires visual representation. So, will suggest to watch the video attached below for better visualization.
The Web Dashboard is shown here
This is how the Web Dashboard looks when everything is normal

This is how the Web Dashboard looks when overall health is normal, but some condition is in recovery
This is how the Web Dashboard looks when everything is recovery

This is how the Web Dashboard looks when overall health is serious
Video
Apologize for very poor audio and video quality.