
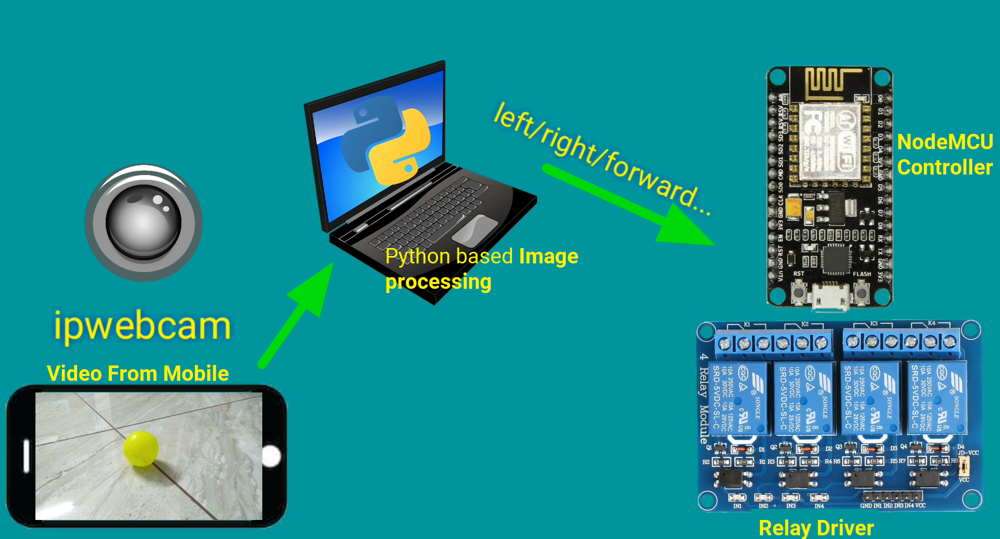
In this tutorial, we are going to make a car that can follow a ball with a very easy method.
Project Flow
- My mobile, mounted on car, sends the video to the Laptop or PC via local host, "ipwebcam"
- Python code in the laptop process the video, which is nothing but the processing image frames.
- After processing the image, python code sends command to the car i.e. Left, right, start, stop.
- Car has NodeMcu and hardware, which drives the car accordingly.
Please note: here I am not using Laptop+ Mobile camera, instead you can also use Raspberry pi+ Webcam
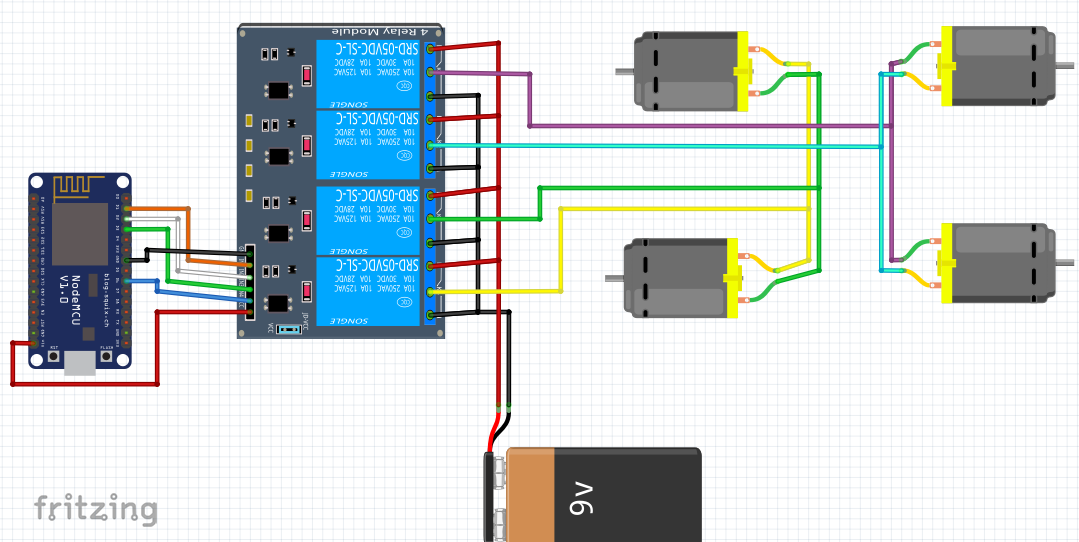
Hardware in the Car
- Relay driver module is controlled by NodeMCU.
- Relay controls the motors.
- Note the connections are made with relay, such that it will drive motors clockwise and anticlockwise. (Check video for details).
Assembly of Car
.jpg)
Code
Programming is simple, attached below.
Just update your SSID and Password fields.
#define STASSID "dot in"         // change your ssid and password
#define STAPSK  "12344321mj"
You will find the code for controlling via server.
When the server is ON with "/forward", code will execute the void forward() function.
server.on("/forward", forward);
  server.on("/back", backward);
  server.on("/left", right);
  server.on("/right", left);
  server.on("/stop", Stop);
in void forward function(), Controller controls the relay and rotate the motor in the forward direction.
void forward() {
  server.send(200, "text/plain", "move Forward");
  digitalWrite(m11, 1);
  digitalWrite(m12, 0);
  digitalWrite(m21, 1);
  digitalWrite(m22, 0);
}
Image Processing
Install and import following libraries.
import requests
import urllib
Before starting, install app "IP Webcam" on your Android phone. Open the App -> go to Start server --> in the bottom, you will find the IP address. Note it and write it in the code, Line no 6.
import cv2
import numpy as np
import requests
import urllib
# cap = cv2.VideoCapture(0)
url = "http://192.168.43.1:8080" # Your url might be different, check the app
cap = cv2.VideoCapture(url+"/video")
def rescale_frame(frame, percent=75):
For detection of the ball, I have used ball color values as below. You can update it as per your ball color.
lower_yellow = np.array([25,129,82])
	upper_yellow = np.array([150,255,255])
You can see, when the ball gets detected it shows the green rectangle around it.
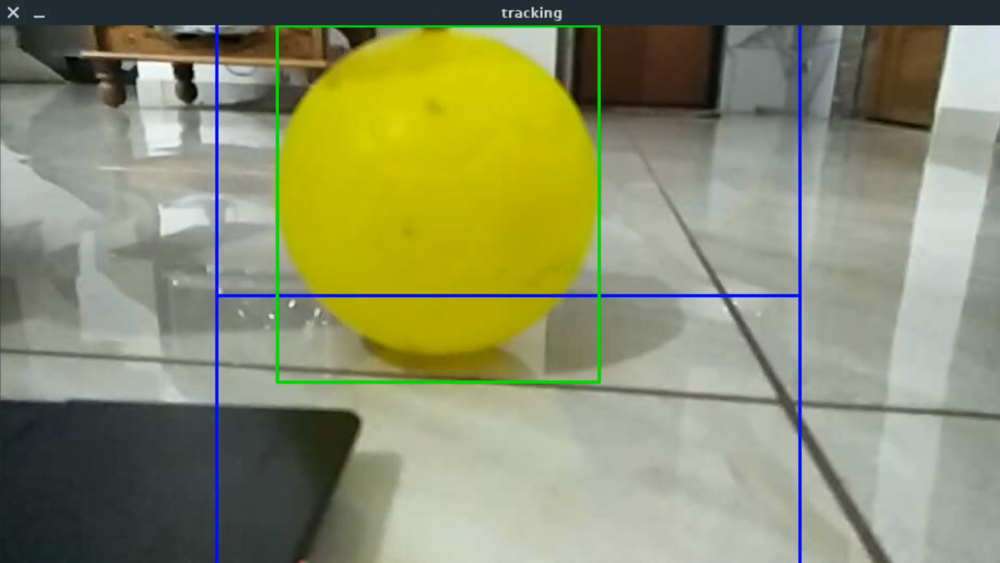
We need center coordinate of the ball, so as we know the formula, I have used it to get the value over here.
x,y,w,h = cv2.boundingRect(contour)
			frame = cv2.rectangle(frame, (x,y),(x+w,y+h),(0,255,0),2)
			print("x=",(x + (x+w))/2)
			print("y=",(y + (y+h))/2)
			getx=(x + (x+w))/2
			gety=(y + (y+h))/2
Based on condition code will create the command for Left, right, forward and stop.
Note: Make sure your Phone, Laptop, NodeMCU connected over same Wi-Fi. You can use your Mobile hotspot as well.
For details watch this Video
Video
Check My YouTube Channel here.
Check my blog here.