Project Overview-
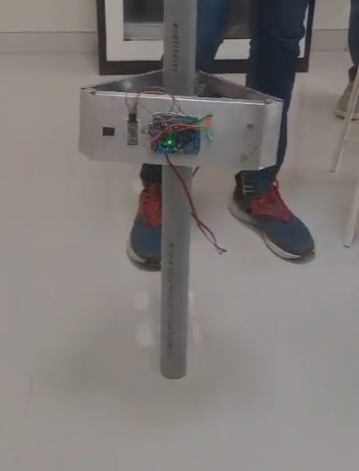
This project was built with the aim of creating a vertical mobility solution capable of ascending and descending cylindrical structures such as utility poles or pipes. The primary goal is to eliminate the risks associated with manual climbing for tasks like inspection, surveillance, or maintenance. By utilising a gripping mechanism powered by high-torque DC motors and a wireless control interface, this robot allows the operator to control the ascent safely from the ground.
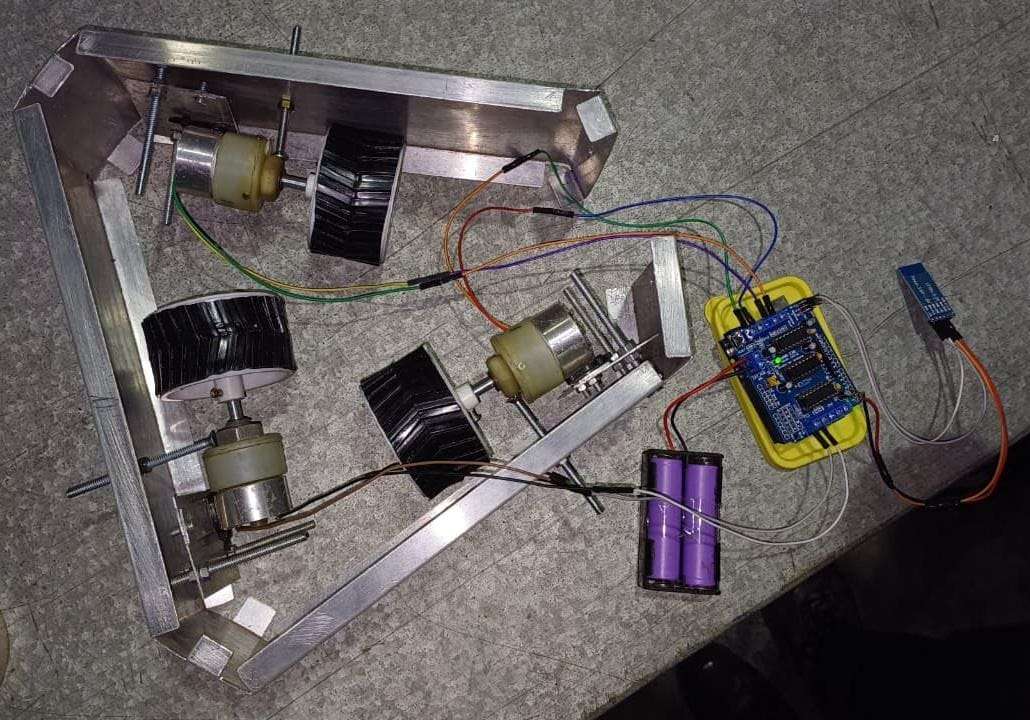
The entire system is designed around a triangular gripping configuration where three motors are arranged at 120-degree intervals. This ensures equal pressure distribution on the pole, allowing the robot to maintain a firm grip while moving vertically.
.jpeg)
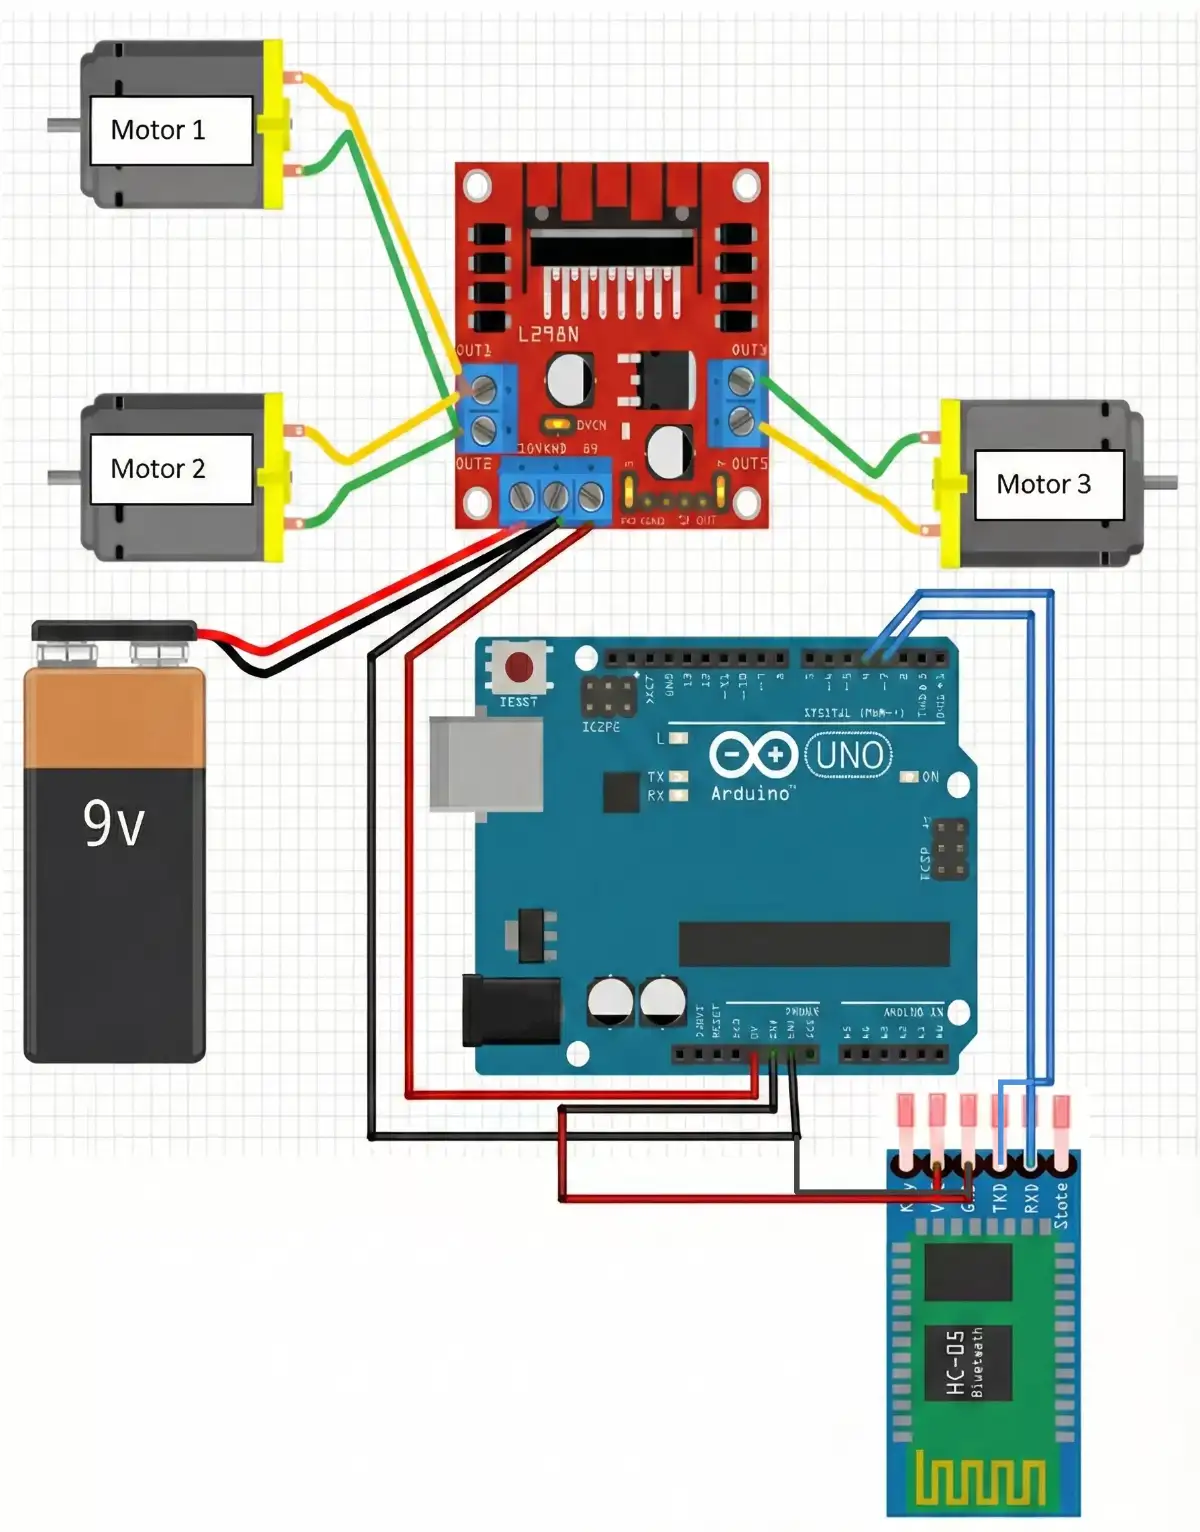
Circuit Connection
Code
#include <SoftwareSerial.h>
// Double Motor Side (Output A on L298N)
// Connect the two motors wired in parallel here
const int MOTOR_PAIR_IN1 = 8;
const int MOTOR_PAIR_IN2 = 9;

// Single Motor Side (Output B on L298N)
// Connect the third, single motor here
const int MOTOR_SINGLE_IN3 = 10;
const int MOTOR_SINGLE_IN4 = 11;

// Bluetooth Pins
// TX of HC-05 goes to Pin 2
// RX of HC-05 goes to Pin 3
const int BT_RX = 2;
const int BT_TX = 3;

SoftwareSerial BTSerial(BT_RX, BT_TX);

char command;

void setup() {
  Serial.begin(9600);
  BTSerial.begin(9600);

  pinMode(MOTOR_PAIR_IN1, OUTPUT);
  pinMode(MOTOR_PAIR_IN2, OUTPUT);
  pinMode(MOTOR_SINGLE_IN3, OUTPUT);
  pinMode(MOTOR_SINGLE_IN4, OUTPUT);

  stopRobot();

  Serial.println("System Ready. 2+1 Motor Config initialized.");
}

void loop() {
  if (BTSerial.available() > 0) {
    command = BTSerial.read();
    Serial.print("Command: ");
    Serial.println(command);


    if (command == 'F') {
      climbUp();
    }
    else if (command == 'B') {
      climbDown();
    }
    else if (command == 'S') {
      stopRobot();
    }
  }
}

void climbUp() {
  // Turn pair of motors Forward
  digitalWrite(MOTOR_PAIR_IN1, HIGH);
  digitalWrite(MOTOR_PAIR_IN2, LOW);

  // Turn single motor Forward
  digitalWrite(MOTOR_SINGLE_IN3, HIGH);
  digitalWrite(MOTOR_SINGLE_IN4, LOW);
}

void climbDown() {
  // Turn pair of motors Backward
  digitalWrite(MOTOR_PAIR_IN1, LOW);
  digitalWrite(MOTOR_PAIR_IN2, HIGH);

  // Turn single motor Backward
  digitalWrite(MOTOR_SINGLE_IN3, LOW);
  digitalWrite(MOTOR_SINGLE_IN4, HIGH);
}

void stopRobot() {
  digitalWrite(MOTOR_PAIR_IN1, LOW);
  digitalWrite(MOTOR_PAIR_IN2, LOW);
  digitalWrite(MOTOR_SINGLE_IN3, LOW);
  digitalWrite(MOTOR_SINGLE_IN4, LOW);
}
Working Principle-
The operation of the robot begins with the power supply. The system is powered by two 3.7V Lithium-Ion cells connected in series to provide a total of 7.4V. This power is routed through a 3-pin toggle switch, which acts as the main ON/OFF controller for the system, ensuring the robot can be safely powered down when not in use.
The central processing unit is the Arduino Uno R3 microcontroller, which interfaces with an HC-05 Bluetooth Module. The user connects to the robot via a smartphone application to send directional commands (Up, Down, Stop).
When a command is received, the Arduino processes the signal and instructs the L298N Motor Driver. This driver manages the three 150RPM DC motors simultaneously. The low RPM and high torque of these motors are crucial; they allow the robot to overcome gravity and the friction of the pole without slipping.
- Ascent: All three motors rotate in a forward direction, driving the wheels up the pole surface.
- Descent: The polarity is reversed by the driver, allowing controlled descent.
- Holding: When stopped, the high gear ratio of the motors acts as a brake to hold the robot in position.