
This DIY project uses an ATtiny85 microcontroller to recreate the classic Simon Says experience. Build your own and impress your friends with your lightning-fast reflexes! The project utilizes colorful LEDs (e.g., 3528) and tactile push buttons for a fun and better experience.
Under the hood, the compact ATtiny85 microcontroller runs the Simon Says algorithm, keeping the game challenging and portable.
For PCB design, this project utilizes EasyEDA.
TOP 3D View BOTTOM 3D View
.png)
.png)
Classic Simon Says Gets a Pocket-Sized, Silent Upgrade!
This project brings the classic Simon Says memory game into a miniaturized, portable format, perfect for challenging yourself on-the-go! But here's the twist: This version offers a silent gameplay option ideal for offices, libraries, or classrooms where keeping things quiet is important.
How it works:
- The game utilizes an ATtiny85 microcontroller to generate the button sequences and control the LEDs.
- Colorful LEDs (e.g., 3528) light up in various sequences, mimicking Simon's commands.
- Tactile push buttons represent Simon's instructions - press the correct button in time to keep the game going!
Traditional Gameplay:
- In classic mode, the game plays a "levelling-up" sound after each successful sequence completion.
Silent Gameplay (Perfect for Quiet Environments):
- For silent operation, I've replaced the speaker with an LED. This LED lights up to indicate a successful sequence and game level increase, providing visual feedback without any distracting sounds.
Challenge your memory and build your own pocket-sized, silent Simon Says game!
Take your project to the next level by building your own PCB!
This project offers two PCB creation options:
- Order directly from JLCPCB: Simply provide the Gerber files (available for download) to JLCPCB for high-quality, professional PCB fabrication. This is a convenient option for those who prefer a ready-made PCB.
- DIY PCB Printing: For a more hands-on experience, you can print your own PCB at home!
I used the DIY method to create my PCB, which adds another layer of accomplishment to the project. Here's a quick overview of the process:
- Print 1:1 Scale Layouts: Print out the top and bottom layer PCB layouts on A4 paper, ensuring a 1:1 scale for accurate transfer.
- Laser Toner Transfer: Use a standard household iron to transfer the laser toner from the paper onto the copper clad board.
- Etching with Ferric Chloride: Etch the unwanted copper using ferric chloride (FeCl3) solution. This process removes excess copper, leaving behind the desired circuit traces.
With some patience and these simple steps, you can have a fully functional PCB ready for assembly in under an hour!
Here is the Video of Breadboard Prototype :
Programming the ATtiny85: Bringing Your Simon Says Game to Life
Before assembling your PCB components, you'll need to program the ATtiny85 microcontroller with the Simon Says game code. Here's how to do it using an Arduino Uno (or any Arduino board with SPI functionality):
Required Hardware:
- Arduino Uno (or compatible board)
- Jumper wires
- ATtiny85 microcontroller
Connections (Important: Observe Proper Voltage Levels):
- Arduino Uno:
- 5V Pin: Connect this pin to the ATtiny85.
- GND Pin: Connect this pin to the GND pin of the ATtiny85.
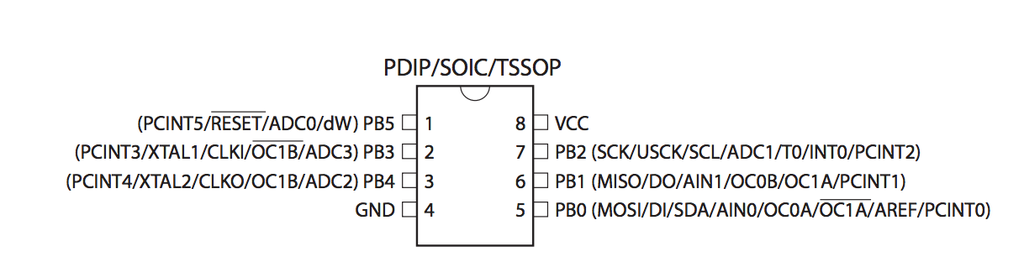
- Digital Pin 13 (MOSI): Connect this pin to pin 2 (MOSI) of the ATtiny85.
- Digital Pin 12 (MISO): Connect this pin to pin 1 (MISO) of the ATtiny85.
- Digital Pin 11 (SCK): Connect this pin to pin 0 (SCK) of the ATtiny85.
- Digital Pin 10 (RESET): Connect this pin to the reset pin of the ATtiny85 (a momentary connection is needed to initiate programming).
Arduino--> ATtiny85

5V            Vcc
GND           GND
Pin 13        Pin 2
Pin 12        Pin 1
Pin 11        Pin 0
Pin 10        Reset
Programming Steps
- Install ATtiny Support in Arduino IDE: Follow the Arduino IDE instructions to add support for the ATtiny85 microcontroller.
- Upload the Code: Load the Simon Says game code into the Arduino IDE. Select the appropriate ATtiny85 board and programmer options.
- Initiate Programming: While holding the reset pin of the ATtiny85 to ground, upload the code to the ATtiny85 using the Arduino IDE. Once the upload is complete, release the reset pin.
#define LED_1 2
#define LED_2 1
#define LED_3 0
// Buttons pin
#define ANALOG_PIN 3  // This is the analog read pin (pin 3)
// Speaker pin
/*        ::Note::
 *  In the core notes is advised to use the "tone()" function on pin 4.
 *  https://github.com/SpenceKonde/ATTinyCore
 */
#define SPEAKER 4

// Tones
#define RED 200
#define YELLOW 400
#define GREEN 600
#define BLUE 800
#define DURATION 100

// Analog thresholds
#define BUTTON1_THRES 895  // Button 1
#define BUTTON2_THRES 636  // Button 2
#define BUTTON3_THRES 383  // Button 3
#define BUTTON4_THRES 150  // Button 4


#define MAX_LENGTH 20  // sequence reduced to have a winnable game (-_-)

// Variables
byte sequence[MAX_LENGTH];  // Array that stores the sequence
byte done = 0;  // Current level
int speed = 800;  // Delay time for the sequence display


// Functions

int getAnalogValue(byte pinNum){  // gets the averaged analog input

   int value = 0;
   for(byte i = 0; i < 5; i++){  // Get the measurements and add them
    value += analogRead(pinNum);
   }
   value = value/5;  // Calculate the average
   return value;
}


byte readbutton() { // Checks what button is pressed

  byte button = 0;
  int analog = getAnalogValue(ANALOG_PIN);
  if (analog >= BUTTON1_THRES) {  // Button 1
    button = 1;
  } else if (analog >= BUTTON2_THRES) {  // Button 2
    button = 2;
  } else if (analog >= BUTTON3_THRES) {  // Button 3
    button = 3;
  } else if (analog >= BUTTON4_THRES) {  // Button 4
    button = 4;
  }
  if (button != 0) {  // Only wait if the button has been pressed.
    delay(50);
    analog = analogRead(ANALOG_PIN);
    if (analog >= BUTTON1_THRES) {  // Button 1
      if (button != 1) button = 0;
    } else if (analog >= BUTTON2_THRES) {  // Button 2
      if (button != 2) button = 0;
    } else if (analog >= BUTTON3_THRES) {  // Button 3
      if (button != 3) button = 0;
    } else if (analog >= BUTTON4_THRES) {  // Button 4
      if (button != 4) button = 0;
    }
  }
  return button;
}


void ledplay(byte k, boolean sound) { // lights the indicated LED and plays the tone associated to it
  switch (k) {
    case 1:  // Red
      PORTB = B00000100;
      if (sound) tone(SPEAKER, RED, DURATION);
      break;
    case 2:  // Green
      PORTB = B00000011;
      if (sound) tone(SPEAKER, GREEN, DURATION);
      break;
    case 3:  // Yellow
      PORTB = B00000001;
      if (sound) tone(SPEAKER, YELLOW, DURATION);
      break;
    case 4:  // Blue
      PORTB = B00000110;
      if (sound) tone(SPEAKER, BLUE, DURATION);
      break;
    default:  // Off
      PORTB = B00000000;
      break;
  }
}


void playsequence(byte* sec, byte len) { // Play the stored sequence
  for (byte i = 0; i < len; i++) {  // repeat for every element of the array
    delay(speed);
    ledplay(*(sec + i), true);  // Light the LED and play the sound linked to the current element
    delay(speed);
    // Turn off LEDs
    PORTB = B00000000;
  }
}

boolean checksequence(byte* sec, byte len) { // Check if the player copies the
                                             // sequence (return true) or of not (return false).
  for (byte i = 0; i < len; i++) {  //repeat this for every element in the array
    unsigned long ttime = millis();  // sets the time to reset the game if no key is pressed
    // Wait for no button to be pressed
    while (readbutton() != 0) {
      delay(10);
      if (millis() - ttime > 30000) { // check if the reset time has passed
        PORTB = B00000000;
        return false;
      }
    }
    // Turn off LEDs
    PORTB = B00000000;
    byte k = 0;
    // wait for any pressed button
    while (k == 0) {
      k = readbutton();
      delay(10);
      if (millis() - ttime > 30000) {  // check if the reset time has passed
        PORTB = B00000000;
        return false;
      }
    }
    // Turn on LED
    ledplay(k, true);
    delay(50);
    // check if the button pressed is wrong
    if (k != *(sec + i)) {  // compares the button with the element of the array
      while (readbutton() != 0) {  // wait for button to be released
        delay(10);
      }
      // The button isn't correct
      tone(SPEAKER, 100, 500);
      for (byte j = 0; j < 50; j++){  // Turn all LEDs on
        PORTB = B00000010;
        delay(5);
        PORTB = B00000101;
        delay(5);
      }
      //delay(500);
      for (byte j = 0; j < len; j++){
        // PORTB = B00000000;  // turn LEDs off
        // tone(SPEAKER, 100, 50);
        tone(SPEAKER, 100, 50);
        PORTB = B00000000;
        delay (300);
        tone(SPEAKER, 300, 50);
        ledplay(*(sec + i), false);  // Turn the correct LED on
        delay(300);
      }
      PORTB = 00000000;
      return false;  // the button isn't correct :( game over
    }
  }
  // Sequence completed :)
  while (readbutton() != 0) {
    delay(10);
  }
  PORTB = B00000000;
  return true;
}


void intro() { // Play intro animation
  tone(SPEAKER, 700, 100);
  // Turn red on
  PORTB = B00000100;
  tone(SPEAKER, 300, 200);
  delay(500);
  // Turn green on
  tone(SPEAKER, 200, 100);
  PORTB = B00000011;
  delay(500);
  tone(SPEAKER, 400, 100);
  // Turn yellow on
  PORTB = B00000001;
  tone(SPEAKER, 100, 300);
  delay(500);
  // Turn blue on
  PORTB = B00000110;
  tone(SPEAKER, 700, 50);
  delay(500);
  // Turn all leds off
  PORTB = B00000000;
  tone(SPEAKER, 450, 200);
}


void lose() { // Play lose animation :(
  // Play game over sequence
  tone(SPEAKER, 100, 50);
  for (int i = 0; i < 8; i++) {
    // Turn on leds red and yellow
    PORTB = B00000101;
    tone(SPEAKER, 300, 50);
    delay(100);
    // Turn on leds 1 and 4
    PORTB = B00000010;
    delay(100);
    tone(SPEAKER, 100, 50);
  }
  // Turn off all LEDs
  PORTB = B00000000;
  noTone(SPEAKER);
}


void winSequence(){  // Play the wining sequence :D
  for (int j = 50; j < 1500; j+=5) {
    tone(SPEAKER, j, 10);
    if (j % 10 == 0) {
      PORTB = B00000101;
    } else {
      PORTB = B00000010;
    }
    delay(10);
  }
  for (int j = 1500; j > 50; j-=5) {
    tone(SPEAKER, j, 10);
    if (j % 10 == 0) {
      PORTB = B00000101;
    } else {
      PORTB = B00000010;
    }
    delay(10);
  }
  //PORTB = B00000000;
  delay(100);
  PORTB = B00000101;
  tone(SPEAKER, 800, 100);
  delay(300);
  tone(SPEAKER, 1000, 50);
  delay(150);
  PORTB = B00000010;
  tone(SPEAKER, 1400, 50);
  delay(200);
  tone(SPEAKER, 800, 100);
  delay(150);
  tone(SPEAKER, 1500, 100);
  PORTB = B00000101;
  delay(500);
  PORTB = B00000010;
  delay(500);
  PORTB = B00000000;
}


// Main code
void setup() {
  pinMode(LED_1, OUTPUT);
  pinMode(LED_2, OUTPUT);
  pinMode(LED_3, OUTPUT);
  pinMode(SPEAKER, OUTPUT);
  analogReference(DEFAULT);  // Sets Vcc as reference (not needed)

  // Play intro
  intro();
}

void loop() {
  // Start the game
  // Whait for any button to be pressed
  int key = 0;
  while (key == 0) {
    key = readbutton();
  }
  ledplay(key, true);  // Turn LED on
  while (readbutton() != 0) {  // Wait for the button to be released
  }
  PORTB = B00000000;  // Turn LEDs off
  randomSeed(millis());
  // Game loop
  while (true) {
    // Add one to the sequence
    done++;
    if (done < MAX_LENGTH) {
      sequence[done - 1] = random(1, 5);
      // Play sequence
      playsequence(sequence, done);
      // Check sequence
      if (!checksequence(sequence, done)) {  // Game over, reset the game
        lose();  // Play game over animation
        done = 0;
        speed = 800;
        break;
      }
      if (speed > 100) {  // // Increase the speed of the game (to a limit)
        speed -= speed / 4;
      }
      delay(250);

    } else {  // Game completed, reset the game
      winSequence();  // play win animation
      done = 0;
      speed = 800;
      break;
    }
  }
}
For a more detailed guide on programming the ATtiny85, refer to this helpful resource: https://homemadehardware.com/guides/programming-an-attiny85/
Ready to test your reflexes and build your own silent Simon Says game?. Grab your soldering iron and get started! ditch the noisy smartphone games and build your own portable, silent Simon Says! It's a fun project for hobbyists and a great way to challenge your memory and reflexes.
What other classic games would you like to see recreated in a silent, pocket-sized version?
Share your ideas in the comments!